Chapter 11. Navigating Source Files
In previous chapters, we’ve learned many different ways to navigate within a single buffer, as well as between open tabs and windows. This chapter will go into detail of different ways to navigate between source files.
11.1. Go To Definition
In my opinion, “Go to Definition” is the most valuable feature language servers have brought us. Major IDEs have supported it for compiled languages for eons, but dynamically typed languages—such as my beloved Python—have always been hell for static analysis, and such features were often pretty hit or miss.
As one of the best-named editor features of all time, “Go to Definition” jumps your cursor from whatever keyword it is currently sitting on to the place where that keyword is defined, regardless of what file it is in.
Most often, I use this when I am looking at a call site for a function and want
to see the function itself. A simple press of gd (go to definition also has one
of the more memorable LazyVim keybindings of all time) will take me there.
Depending on how good the LSP for the language I am editing is, this often even allows me to jump into library files or type declarations for third party modules so I can see what is really going on.
Go to definition is context dependent, but will usually do exactly what you
expect. If you are looking at a variable, gd will jump to wherever the
variable is initialized. If your cursor is on a class name, it will jump to
wherever the class is defined.
Typically, once you’ve jumped to a definition and learned what you need to
learn from that file, you’ll immediately want to jump back to where you
started. You can do this easily using Control-o, as we discussed in Chapter 3
(and Control-i can move forward in your jump history).
11.2. Go To References
The inverse of the Go to Definition command is “Go to References”. If you are
looking at a function, variable, type, etc, and want to see all the places
that variable is accessed, use the gr command.
Unlike with a definition or declaration, there will typically be more than one
reference to a given word (a variable in isolation is a useless variable,
indeed). So when you type gr it usually won’t immediately jump to a location.
Instead it will pop up a picker view of all the references to the word that was
under your cursor, with all the preview and filtering luxury that the picker
always brings.
It is common to want to perform some action—such as a rename or adding an
argument or what have you—at every reference. You could keep showing the
picker by hitting gr again or by using the <Space>sR keybinding
which resumes your previous picker search. However, it is often much more
useful to use the Trouble list that we learned about in Chapter 10.
To do that, use gr to show the references in a picker as usual. Then use
Alt-t to open all results in Trouble. You can also select which results to
send to Trouble before opening them using the selection behaviour described
in Chapter 4.
11.3. Context-specific Help
Most non-modal editors show you some help or “hover” text when you hold your mouse over a word or symbol. The quantity and value of this text varies widely depending on the LSP, but usually includes a function signature and documentation for the word under the cursor.
It’s probably possible to set up Neovim to show help texts on hover, but why
would you move your hand to the mouse when LazyVim has such amazing navigation
on the keyboard? Instead, use the (shifted) K keybinding. Yeah, K is a pretty
stupid mnemonic to remember, but H and ? were already taken.
In fact, the K stands for “keywordprog”, which is a legacy Vim concept
that has been superseded by language servers in the modern world. So LazyVim
reappropriated the keybinding. |
11.4. Listing Symbols
Another handy LSP feature is to search all the symbols in the current file or
project. If you are editing a particularly long file and need to jump to a
function that is not terribly close to your cursor, you might use the
<Space>ss command (mnemonic is “search symbols”). As hinted by the double
s, this is expected to be a fairly common action.
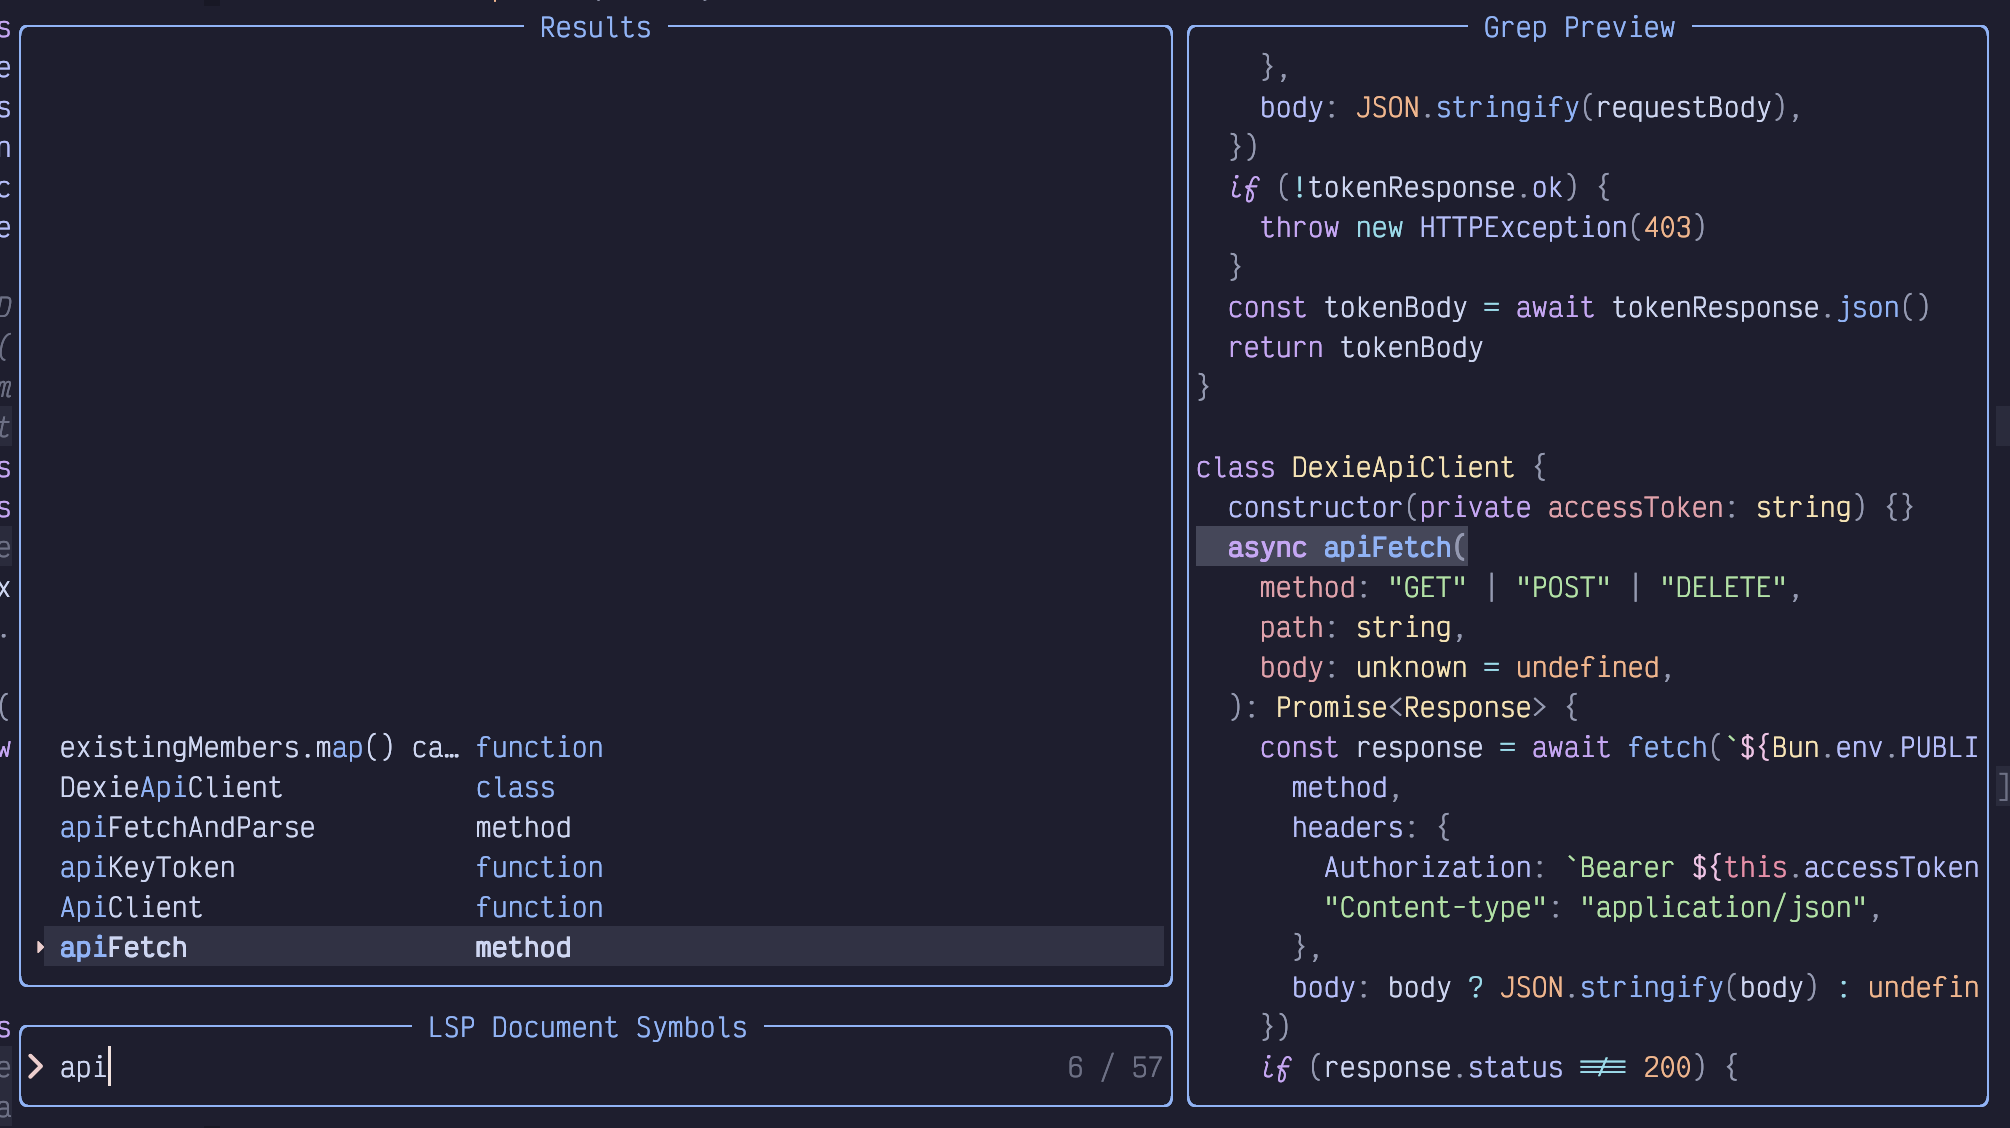
The dialog that pops up should be fairly familiar by now, as it’s the usual picker:

Figure 49. Picker Symbols
So you already know how to use it. However, I want to remind you of a couple Picker tips that make it more useful:
Most of the time when I’m using this symbol picker, I only care about
functions, or sometimes classes. So the fields and properties scattered in the
screenshot above are just a distraction. It is possible to configure the
picker to only show certain kinds of symbols, but I prefer a quick trick that
allows me to narrow it down to just functions: type (part of) the word
function.
Since the picker includes the word “function” in the second column of the results, it merrily filters out all the lines that don’t have that word in them. Handy.
Better yet, I can input a space after the word “function” to inform the picker to perform subsequent searching back in the first column. So “func api” filters all functions that have the word “api” in them.
My second tip is to not forget about the Control-q and Alt-t shortcuts
to dump picker results into the Quick Fix or Trouble list. It generates a
quick and dirty table of contents of whatever symbols you filtered for.
If you want to search all the symbols in your whole project, use the “but
bigger” mnemonic. <Space>sS will perform such a search. However, be warned
that not all LSPs support workspace symbol search. Some only search in
currently open files, and even many of those that fully support workspace
symbol search are unusably slow.
11.5. Trouble Also has a Symbols Outline
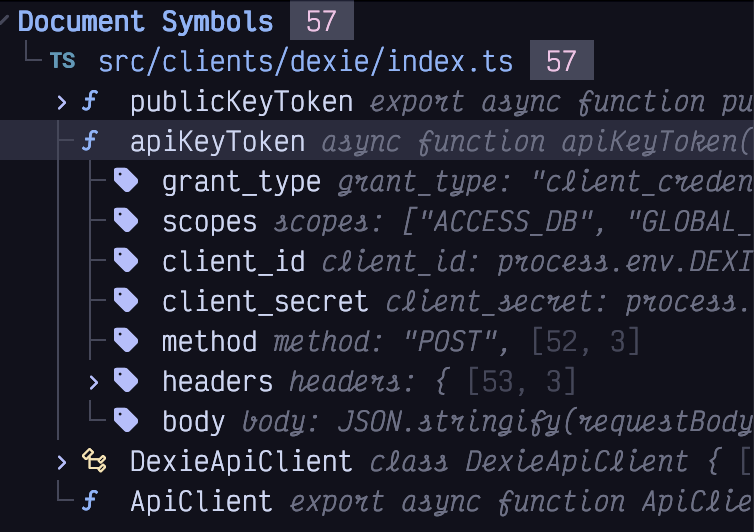
You can also open a symbols outline using the Trouble plugin. The keybinding is
<Space>cs, which you may have trouble finding because it is in the Code
menu rather than the Search menu. Unlike most Trouble windows, it opens in a
right sidebar by default. It creates a lovely tree view and you can even
collapse and expand the tree nodes using the folds keybindings we discussed in
Chapter 9.

Figure 50. Trouble Symbols
You can resize the Trouble window using the same keybindings you usually use
for resizing windows (<Space>w< and <Space>w>). As you move the cursor over
the Trouble window, the symbol it is over will automatically scroll into
view.
The fastest way to use the Trouble window is to use Seek mode. Recall that
Seek mode can jump to any currently visible window, which includes Trouble.
So if I am currently editing the above file and my cursor is currently somewhere
near the end of the file, I can use spub to enter Seek mode and search for
the characters “pub”. This will place a label on the publicKeyToken in
the Trouble window. If I hit that label, my cursor jumps to the trouble
window and my editor window immediately scrolls to the function in question.
Now I just have to hit Enter to move the cursor back to the file I’m editing.
11.6. Context
The nvim-treesitter-context extra is a helpful way to know where you are in
the current file. It uses treesitter to figure out which functions and types
you are in, and then pins the lines that define those types to the top of the
editor. Enable it as usual by visiting :LazyExtras and hitting x over the
line that contains nvim-treesitter-context.
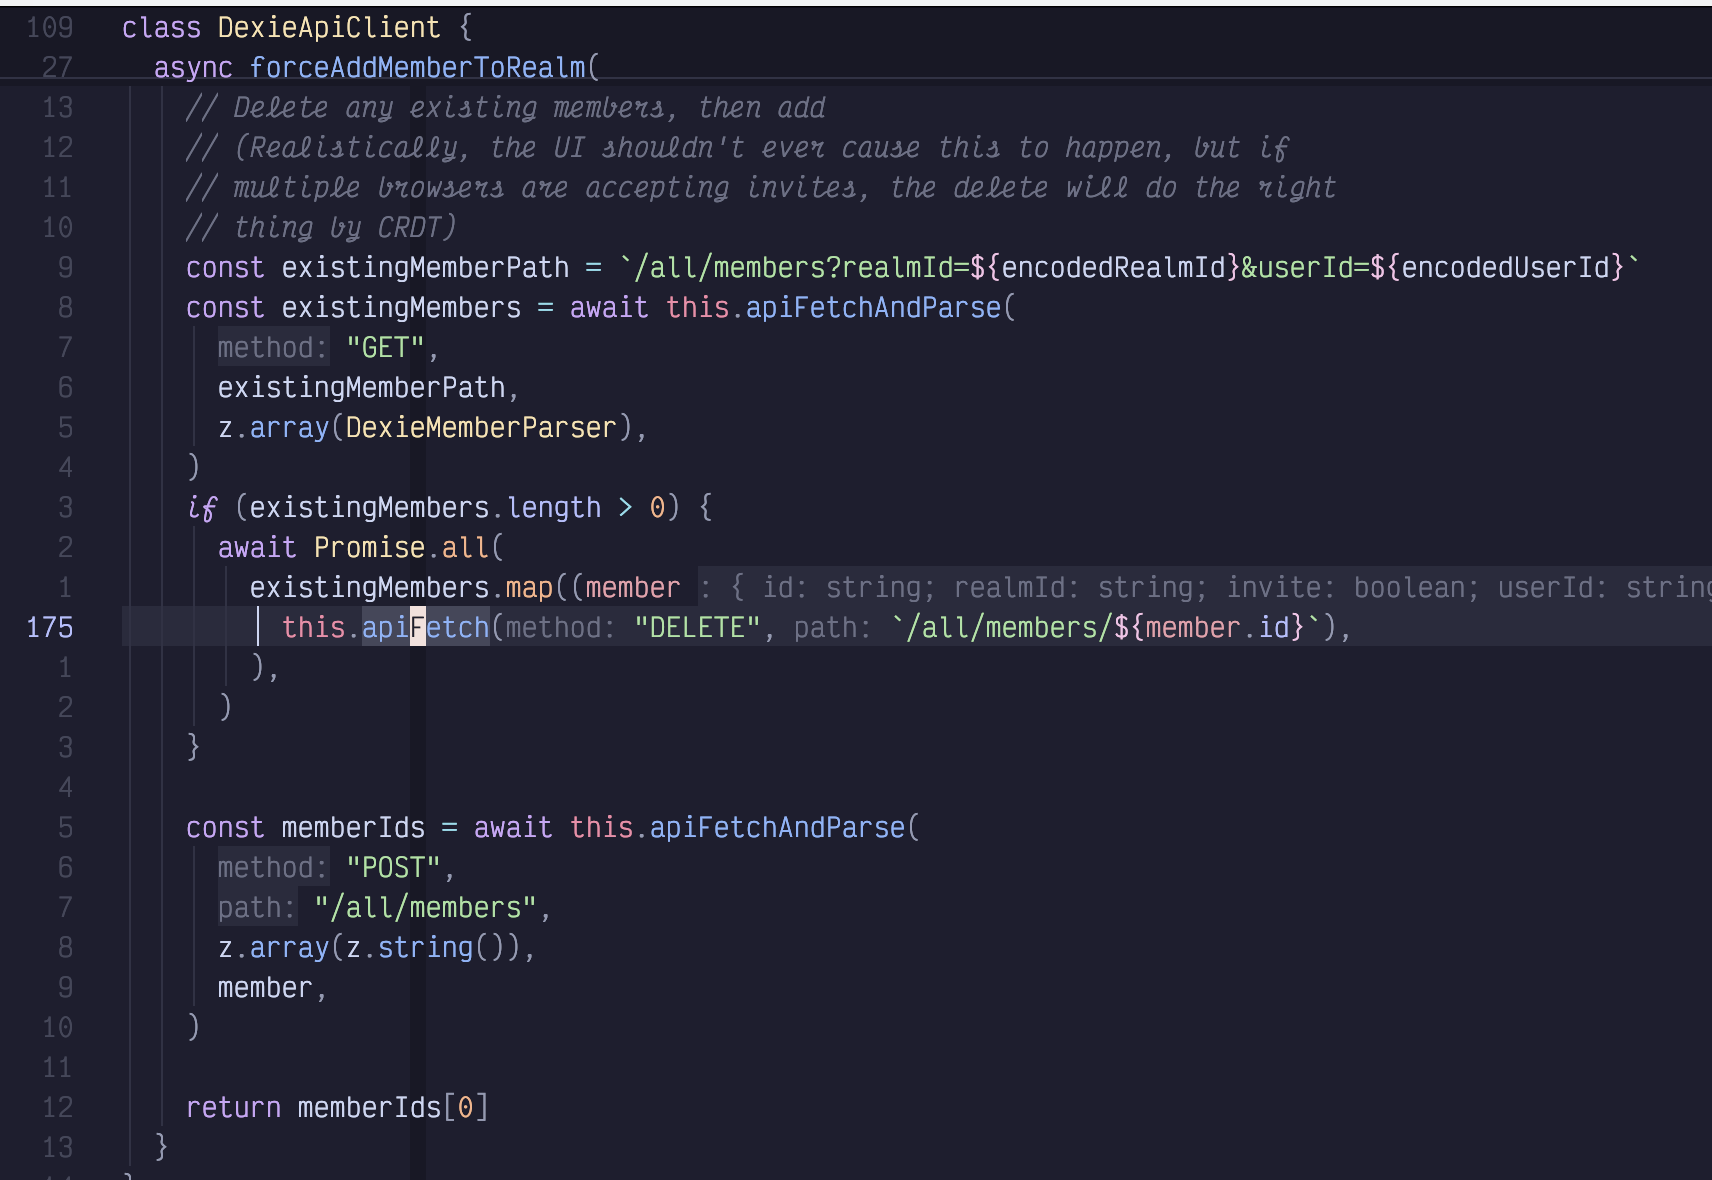
This plugin keeps track of which class or function your cursor is currently in. If the function or type definition is so long that the signature scrolls off the screen, it will helpfully copy that signature into the first line or lines of the code window, highlighted with a slightly different background colour.
This is easier to describe with a reference image, so consider this screenshot:

Figure 51. Treesitter Context
In this image, the first two lines, which are slightly shaded, are providing
context, rather than being part of the buffer. The first line tells me that I
am in the DexieApiClient class and the second line tells me that I’m
currently looking at the forceAddMemberToRealm method in that class.
Especially notice the relative line number column. The class DexieApiClient
line is 109 lines above my current cursor position, and the async
forceAddMemberToRealm line is 27 lines above it. In contrast, the first
visible line of the function is only 13 lines above my current cursor
position.
The effect is quite subtle, but the definitions that make their way into this
context section tend to be exactly what you need while coding. If they fit on
one line I can see function signatures and return types. You really don’t
notice how often you have to scroll up to see what a variable is named in a
function signature until you don’t have to do it anymore! And if you DO need to
scroll up to the signature, simply type the relative line number followed by
k and you’re there with no searching required.
If you need to disable the context temporarily, use the keybinding <Space>ut.
We haven’t seen much of the <Space>u menu yet, where you can toggle various
User Interface effects. This is largely because the default user interface is
configured well enough that you don’t want to change it often!
11.7. Navigating with (Book)marks
You already know how to navigate through your history with Control-o and
Control-i, and to jump around documents effectively using a wide variety of
motions.
Vim also includes a “bookmarks” feature, although it’s referred to as
“marks” I assume because the m character was still free on the Vim keymaps.
Marks are built-into Vim and LazyVim has (as usual) added a few minor improvements.
Much like the registers that we covered in Chapter 8, marks can be assigned to each letter of the alphabet. Additionally, certain punctuation characters represent special system-set marks that you can jump to, but not set.
To set a mark on a line, precede any letter character with the letter m. So
ma will set the mark a on the current line. You can tell that this line
is marked with an a because there is an a character in the gutter to the
left:

Figure 52. Mark in Sign Column
Now I can jump to the line marked with a from anywhere in the current file
by using an apostrophe followed by a.
I don’t use this very often because other tools tend to be more useful for
navigating within a file than manually setting a mark. However, if I had marked
the line with a capital letter (e.g. mA), I would be able to jump to the mark
no matter which file is currently open using 'A.
So essentially, you can have up to 26 local marks within each file you ever open, as well as 26 global marks that you can access from any file.
Conveniently, if I just type a single apostrophe (in Normal mode), LazyVim will pop up a menu of all the marks currently available to jump to:

Figure 53. Marks Menu
This list shows the lowercase a mark that I’ve set in this file, several
system marks that I can jump to using punctuation (notice the descriptions
for each of those marks to the right so you don’t have to memorize them),
two global marks I use to jump to my kitty and fish configuration files,
and the ten numbered marks.
I find the numbered marks to be kind of useless. They essentially refer to the
file and cursor location of the last time you closed Neovim. I don’t close
Neovim that often unless I’m editing a commit message or pull request
description in a temporary instance, so my numbered marks are mostly just those
kinds of temporary files. If I need to get back to where I was previously, the
<Space>qs keybinding to restore session is typically more useful than the
numbered marks.
The menu that pops up when you press the apostrophe key is usually sufficient
to find marks, but you can also use the <Space>sm keybinding to search marks
in a picker. I don’t usually have enough marks active for this to be useful,
but if you’ve got a lot of global and local marks set and you can’t remember
which letter is associated with a given one, it might help to use the picker to
search for the contents of the line you have marked.
Once you’ve set a mark, you’ll eventually be dogged by the question “how do I
get rid of it?” Deleting marks is probably up there with “how do I quit Vim”
for most common queries! There isn’t a keybinding for deleting marks. Instead,
you need to use the command :delmarks <mark> to delete the given mark. This
can be shortened to :delm <mark>. So to get rid of the a mark in this
file, I used the command :delmarks a. You don’t have to be on the marked
line to delete the mark.
In Command mode, marks can be used in place of line numbers in ranges. For example,
if you want to write the text between mark a and mark b to a file, you could
do :'a,'bwrite somefile.txt. If you’ve seen the '<,'> in front of colon lines
when you have text selected, that is because '< and '> represent the start
and end of the most recent visual selection. So rather than manually setting
ma and mb you can visually select the thing you want to write and
have those marks pre-filled for you.
You can also use '< and '> to jump to the beginning or end of the most
recent selection even if it has since been deselected.
The other symbol mark that I use frequently '. which jumps to the last place
I inserted or changed text. This can sometimes be quicker than a series of
Control-o keypresses.
11.8. Summary
In this chapter, we learned how to navigate code files using go to definition and references, and various “document symbol” plugins.
We saw how LazyVim gives us context on our current location in the document and how to look up documentation for the symbol under the cursor.
Finally, we covered Vim marks, a more manual process of tracking locations that you may want to jump to.
In the next chapter, we’ll learn all about searching text both in the current file and globally across a project.