Chapter 12. Searching…
It’s kind of amazing that we’ve gotten this far without covering searching. Find and replace in Vim has always been far more powerful and nuanced than in most editors, which just give you a little dialog with three fields and, if you’re lucky, a check box to specify regular expressions.
LazyVim extends Neovim’s powerful search feature to make it both easier to use
and prettier. You know about the Seek (s) and Treesitter (S) modes for
navigating to and selecting objects you can see, as well as their remote
operator-pending objects counterparts: r and R. These work great when the
text you are looking for is currently visible. However, when you need to search
a file and have it automatically scroll to search results, they are
insufficient.
12.1. Search in Current File
To search for a pattern in Vim use the / command in Normal mode. The mnemonic
is that the / key is also the question mark key, and searching for something
is a kind of question.
Many tools that are not considered “modal” have adopted Vi’s / as
a command to invoke search. For example, the exceptional Linear task tracking
tool uses / to begin a search, as does the ubiquitous GitHub. |
The first time you type a / in Normal mode, you might lose your
cursor! It doesn’t pop up a new window. Instead, / takes over the current
file’s status bar with a magnifying glass icon:
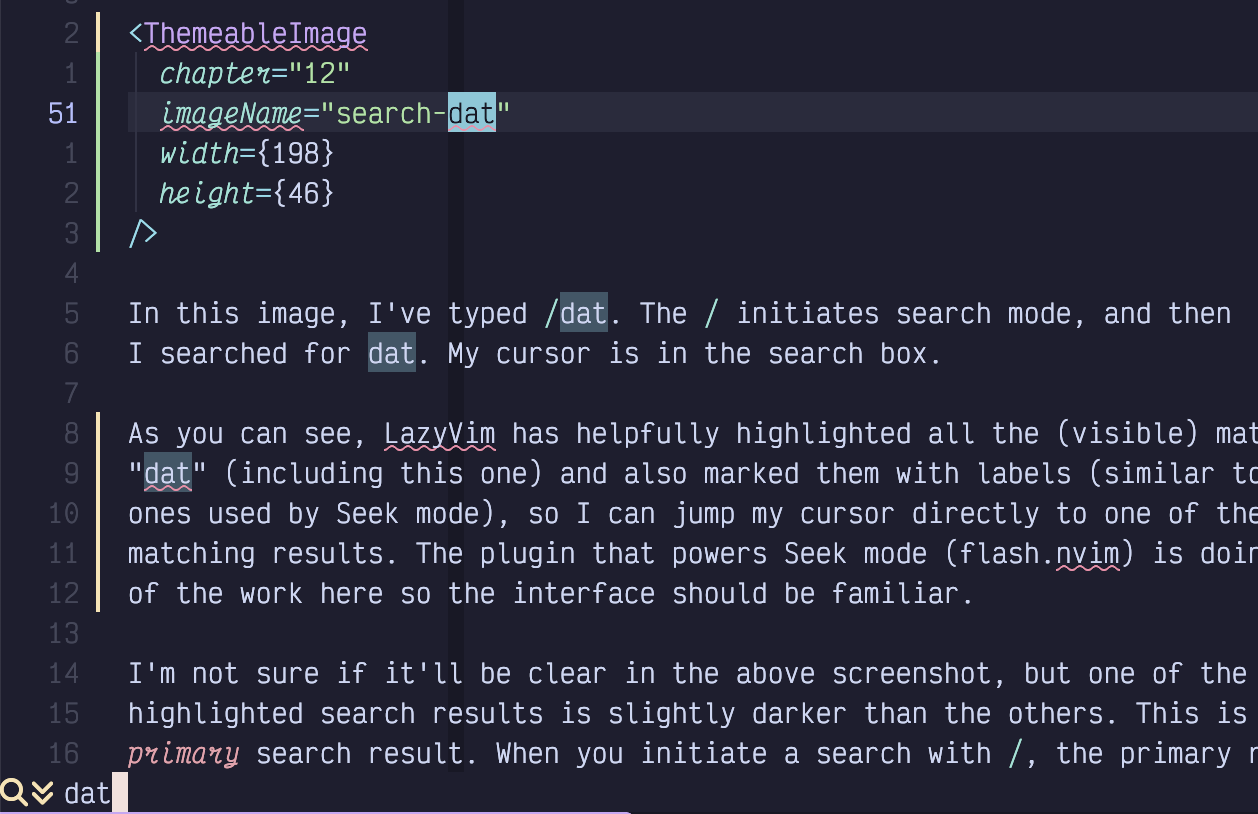
Figure 53. Search “dat”
In this image, I’ve typed /dat. The / initiates Search mode, and then
I searched for dat. My cursor is in the search box.
As you can see, LazyVim has helpfully highlighted all the (visible) matches for
“dat”. The "primary" result will always be the first matching
result after the point where your cursor was when you hit /.
Your cursor will jump to the primary result if you press Enter to confirm
your search. Press Escape to cancel it, as usual.
At this point, you are back in Normal mode and can edit the buffer normally.
Before doing so, however, notice that all the highlighted results are still
highlighted. You can easily jump to the next result using the n (for next)
key. This command accepts a count, so you can use 3n to jump to the third
result after the current cursor position.
The search will wrap to the top of the document if there are no more matching
results at the bottom. If you know how far you need to jump, you can use a
count with the / command as well, as in 3/something to jump forward to the
third something. Figuring out how far you need to jump requires some mental
agility, though, so it’s usually faster to use Seek mode.
If you n too far, you can use Shift-N to move the cursor to the previous
result instead. And if you know you need to search backwards to a previous
result, you can initiate the search with ? (i.e. Shift-/) instead of just
/.
If you have used Vim before, I should warn you that this behaviour of
n and N is different from the default Neovim behaviour. They used to
“repeat the last / or ? command,” so n would continue up the document
if you started with ?. The LazyVim model is easier to remember; n always
means “next down” and N always means “previous up”. |
12.2. Ignore Case
If you enter your search term as all lowercase letters, LazyVim will ignore
case by default, but if you include a capital letter in your search term, it
will enable case sensitivity. So searching for in will match in and In,
but searching for In will only match In.
If you expressly want to search for only lowercase matches, you can modify the
search term by inserting the two characters \C (that C is capitalized)
somewhere in it.
Conveniently, it doesn’t have to be at the beginning of the search term; if
there is a \C anywhere in the search string, it will make the whole search
case sensitive. So, imagine you were looking for the lowercase word “initiate”.
If you start typing in and realize it’s matching a bunch of unnecessary In
because ignore case is enabled, you can append \C (so you end up with in\C)
to switch to ignore case mode before typing iti (so the total search string
is in\Citi).
If you want to completely disable ignore case temporarily, type the colon
command :set noignorecase. This will only last until you exit Neovim, or
explicitly enable it again with :set ignorecase.
If you want to make the change permanent, open your options.lua file and add
vim.opt.ignorecase = false somewhere in it. Note that now if you want to make
any specific search case insensitive, you need to use lowercase \c instead
of \C in the search phrase.
The \C trick seems kind of weird at first, but when you think about the
alternative used in most code editors, where you have to move your hand to your
mouse, target a tiny checkbox with a label like wW, and click it, then
refocus the search box and continue typing, you’ll probably decide that \C is
faster.
12.3. Regular Expressions
Vim searches use regular expressions by default. But they are kind of strange regular expressions.
Ok, I admit that all regular expressions are kind of strange. Vim’s are only strange in comparison to the PCRE-style regular expressions that are common in most modern programming languages. Luckily, if you are searching text, you probably don’t need the full complexity the Perl-compatible expressions offer.
I don’t have space in this book to instruct in regular expression syntax, so I’ll just mention some of the main go-tos and leave you to look up the rest:
.matches any single character. If you need to search for a literal period, escape it with\..\Smatches any non-whitespace character.The
*character matches the preceding expression zero or more times. Notably,.*will match any string of characters of arbitrary length.The
\+string will match the preceding expression one or more times. (This is notably different from most regular expression parsers I’ve seen, where you don’t need the\before the+to match one or more). It can be combined with e.g.\Sto match any word without spaces:\S\+.\=can be used to match the preceding pattern zero or one times. Useful for things likehttps\=:where the “s” is optional. This pattern is usually?in most regular expression engines, and in fact\?also works for this. However, it would confuse Vim when the command to invoke search backwards is?, so\=wins.\\matches a literal backslash and\/matches a literal forward slash.
In general, if you know PCRE-style regular expressions, you’ll find you need a lot more backslashes in Vim. That said, the vast majority of code editor searches are covered by the above.
If you want to “disable” regular expression matching for a specific search,
place \V at the beginning of the line (or in the middle of the line if you
only need to disable it for the remaining part of the search). The “V” stands
for “very nomagic”, and if you want to become extremely confused, type :help
magic. It is so confusing, in fact, that you will prefer to learn to just
use regular expressions (yes, I am aware how very confusing that is. Vim’s
interpretation of magic is worse).
If you desperately need a regular expression to do something you can
ask Claude skim through :help regular expressions to find
the syntax you need. You will come away either enlightened or frustrated.
12.4. Search In Project
If you need to search for a word across your entire codebase, instead of just
in one file, use the command <Space>/ instead of just /. It will pop up
the ever-so-familiar picker, this time in something called live_grep mode.
Fun fact: On the command line, grep is a tool that is used for regular
expression searching, and the name comes from the ed (remember ed, the
predecessor of vi, ex, and sed?) command g/re/p, which maps to "global
/ regular expression / print". The live in LazyVim’s "live grep" means that
the searching happens as you type instead of waiting to run a command line like
the grep utility does.
LazyVim uses a tool called ripgrep that is a lot faster and more featureful
than the original grep tool, so make sure you have ripgrep installed and
available on your path as rg.
Type the string you are looking for. The results will show up in the left side and the file will display in a preview on the right so you can be sure you found the right one:
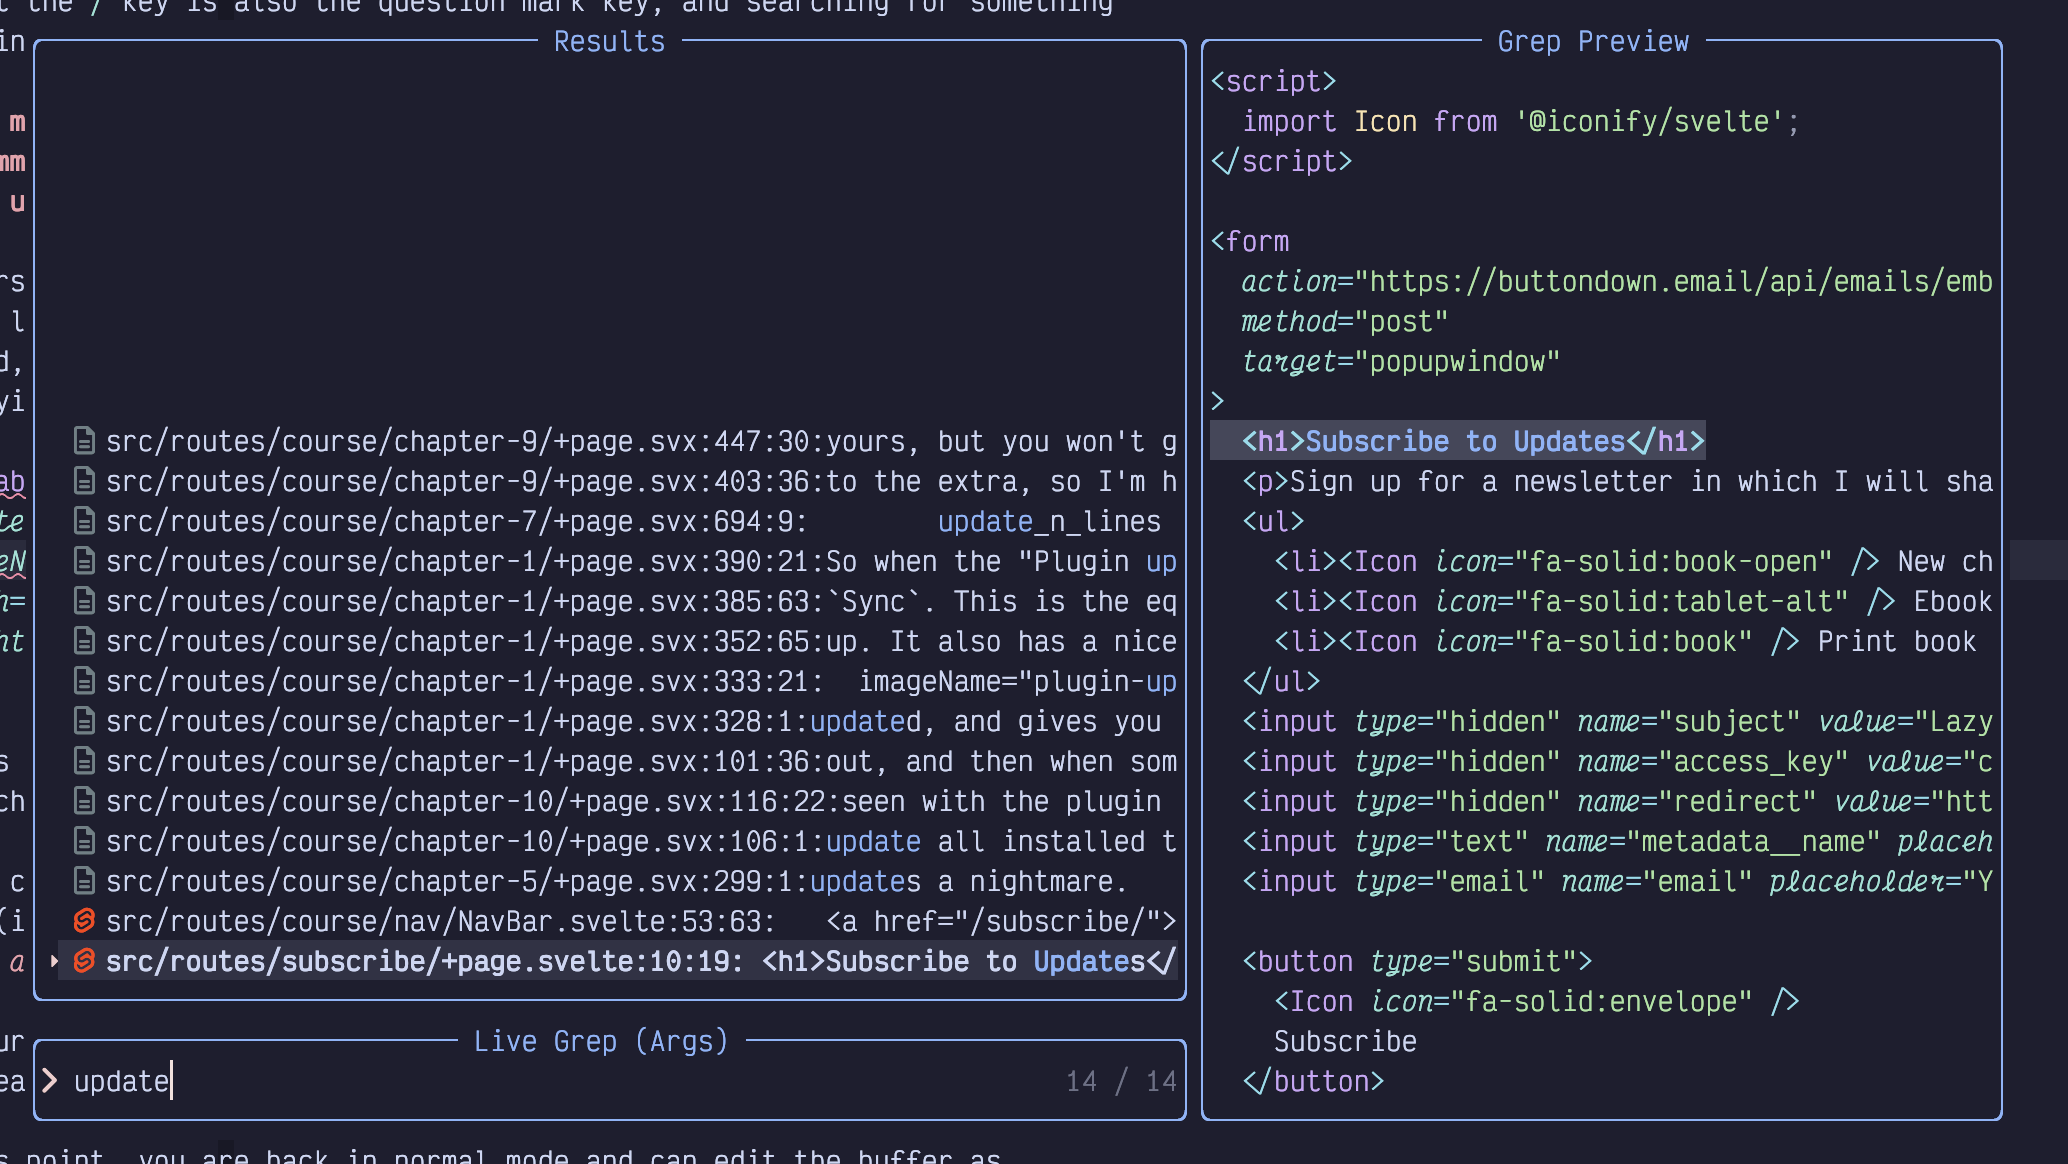
Figure 54. Live Grep Picker
Remember that you can add labels to picker results by pressing Alt-s. I
find this more useful in the live_grep window because unlike most pickers, a
space in live_grep is sent as a literal space to ripgrep, instead of
allowing us to narrow the search results by searching for something earlier in
the line as we discussed in chapter 4.
Since this is a picker, you can press Alt-t while it is open to put all
the search results into the Trouble window so you can navigate them while
editing (using ]q and [q). |
Annoyingly, this search mode is completely different from Vim’s built-in
search. It just passes your pattern to ripgrep and behaves the way ripgrep
does. And ripgrep doesn’t know about things like Vim’s strange regular
expression engine. It does support regular expressions, but they use
maddeningly different syntax from Vim. Which is to say, the same syntax as
pretty much everything that isn’t Vim. It’s Vim that’s maddening here, not
ripgrep. Just so we’re all clear.
12.5. Summary
This chapter was all about search: the / shortcut to enter Search in file
mode, and the <Space>/ shortcut to enter find in project mode.
Searching is, of course, only half the story. In the next chapter, we’ll cover replacing text, both as part of a search operation and at a more project-wide level.