Chapter 14. Miscellaneous Editing Tips
Before we dive into some of the more “IDE-like” behaviours that LazyVim enables, I wanted to collect some tips that can make your editing life a little more fun. This chapter is a bit of a grab bag, and includes some commands and plugins that I couldn’t fit anywhere else.
14.1. Word Counts
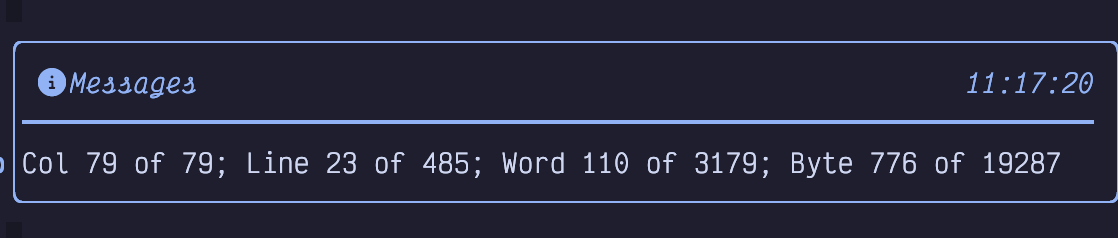
Use g<Control-g> to spit out a message containing some helpful info about the
current cursor position:
Figure 72. Word Count
Most notably, the “Word 110 of 3179” tells me that this chapter has over 3000 words in it (obviously I updated this section after I wrote more words!)
14.2. Transposed Characters
How often do you type so fast that you accidentally transpose two chracters?
I’m looking at you, hte!
Simply use xp to swap a character with the one to the right of it. For example,
if you have typed ra when you meant to type ar, put your cursor on the r and
hit xp.
This is not a special custom command. It just uses the default “delete
character” and “put last deleted after the cursor” commands to move the
character from its current position to the next one. You can use a similar idea
to move other text around. For example, move a word with dwwP or use daWwp
to delete an argument and move it later in a function signature.
14.3. Commenting and Uncommenting Code
LazyVim ships with a plugin for commenting and uncommenting code in older versions of Neovim, but as of Neovim 0.10, this is actually a native Neovim feature.
The verb for toggling comments is gc and can be followed by a motion or text
object. So gc5j will comment this line and the five lines below it, while
gcap will comment out an entire block separated by newlines.
This command pairs beautifully with the S command to comment out a
surrounding text object. For example gcSh will comment out the function
surrounded by the h labels after the S is invoked.
To comment out a single line, use the easy-to-type shortcut gcc. This command
can take a count, so 5gcc will comment out five lines (a little easier to
type than gc4j).
As with most verbs, gc can also be applied to a visual selection with e.g.
V5jgc.
The gc verb is actually a toggle, so if a line is currently commented, it
will uncomment it instead of commenting it a second time. Thus, gccgcc is a
no-op. However, note that if you have a selection that contains commented and
uncommented lines, you will end up with a double comment. This is usually what
you want: If you temporarily comment out a block that contains other comments,
when you uncomment that block, you probably want the original comments to stay
commented.
As a shortcut, if you want to add a new comment line above or below the current
line, instead of commenting the current line, you can use gcO and gco.
Technically this is a new verb, but for memory’s sake, think of it as combining
gc with the verbs to open a new line (o and O).
14.4. Incrementing and Decrementing Numbers
If your cursor is currently on a number in Normal mode, you can use Control-a to
increment that number. This command is somewhat smart and does the “right thing”
if your number needs new digits. So 9 becomes 10 and 99 becomes 100 when
you press Control-a anywhere in the number.
To decrement a number, use Control-x.
I hated these two keybindings for the longest time because they are only occasionally useful, but when they are useful, I couldn’t remember the keybindings. So I spent a long time manually incrementing numbers and thinking to myself “I need to look up those number increment commands,” but the only keywords associated with this help section were the keybindings themselves!
Eventually I learned about the :helpgrep command, which allows you to search
the help. Long before I memorized the keybindings, I remembered that :helpgrep
Adding and subtracting would help me look them up.
But there is actually a mnemonic for these keybindings: Control-a is “Add”,
which is easy enough to remember. Control-x is a little harder, but now that
you have Control-a you’ll be able to look it up with :help CTRL-a. I’m not
sure if it will help anyone else, but I think of the x as “'cross' out one
digit to subtract”.
Use g<Control-a> and g<Control-x> to decrement numbers on consecutive lines
with an additional increment for each line in the count. This is useful if you
are manipulating numbered lists. Say you want to make a list of 10 items. First
type o1.<esc> to make a line that says 1.. Then type 9. to repeat that
command 9 times. Now you have:
Listing 41. A Dumb List
1.
1.
1.
1.
1.
1.
1.
1.
1.
1.
You can use V'[ to select the 9 rows that just got inserted, as the '[ mark
is the first character of the previously changed text. Now type g<Control-a>
to increment them and you end up with:
Listing 42. A Smarter List
1.
2.
3.
4.
5.
6.
7.
8.
9.
10.
Not bad for just a handful of odd-looking keystrokes:
oi1.<Esc>9.V'[g<Control-a>!
If you need to insert a new entry in the middle of a list, add the entry,
select the lines with the remaining entries, and hit Control-a to sync them up.
Neovim will smartly increment just the first number it encounters on a line. This means it is easy to e.g. manipulate a book’s outline even if it contains multiple numbers. Consider this hypothetical outline of a book largely unlike this one:
Listing 43. Some Book Chapters
Chapter 1: Intro and Install
Chapter 2: 1 Weird modal editing trick
Chapter 3: The numbered marks 1-9
Chapter 4: Navigating things
...
Let’s say I want to split Chapter 1 into two different chapters: “Intro” and “Install”. I can simply add the new chapter using normal text insertion like this:
Listing 44. Adding a New Chapter
Chapter 1: Intro
Chapter 2: Install
Chapter 2: 1 Weird modal editing trick
Chapter 3: The numbered marks 1-9
Chapter 4: Navigating things
...
Then I can use <Shift-V>} to select the chapters originally numbered 2 and
higher. When I hit Control-a, the chapter numbers are incremented, but
the 1 in 1 Weird trick will not be impacted, nor will the numbered marks
indicators.
Listing 45. Sync Up the Numbers
Chapter 1: Intro
Chapter 2: Install
Chapter 3: 1 Weird modal editing trick
Chapter 4: The numbered marks 1-9
Chapter 5: Navigating things
...
14.4.1. The Dial.nvim Extra
If the increment and decrement keybindings sound kind of like that weird
kitchen unitasker that is helpful once a year, you might want to consider
installing the editor.dial extra from :LazyExtras.
This extra installs the dial.nvim plugin which allows you to increment and
decrement a bunch of other cool stuff in addition to numbers. I mostly use it
to swap boolean expressions (both Control-a and Control-x will alternate
true to false and vice versa.), but it can also increment words (“first”
increments to “second”), months (“December” increments to “January”),
version numbers, Markdown headers, and more. You can even extend it with your
own patterns if you need to.
14.5. Changing Indentation
The > and < keybindings can be used in Normal mode to indent or dedent
text. Most often, you’ll use them doubled up (as in << and >>) to change
the indentation of the current line. However, you can also change the
indentation of any motion. Another common one is >Sx to indent a treesitter
entity by some label x, and >ap will indent an entire blanks-delimited
paragraph.
These verbs can get a little confusing when it comes to using counts. You might
expect 2>> to indent the current line by two indentation levels, but instead,
it will indent two lines by one indentation level.
When you want to change by multiple indents in one command, you will need to
resort to Visual mode. To indent the current line by five indentation widths,
the quickest way is with v5>, compared to typing ten greater-than symbols.
This works with any visual selection, so you can use, for example, va{5> to
indent an entire block five levels.
Often, all you want to do is “make the indentation correct for this
programming language”. If conform.nvim is configured correctly, the easiest
way to do this is to just save the file. LazyVim has format on save enabled by
default, and if it can find a formatter, it will use it. You can also use gq
with a motion or selection (most commonly gqag to format the entire file) to
apply formatting.
However, if you don’t want to save, or aren’t using conform.nvim, you can also
use the = verb. The behaviour of = depends a little on the programming
language, but it generally applies the indentation engine to the visually
selected (or motion selected) lines as though you had pressed enter to start
a new line. The end result is that all lines will be indented “correctly” for
some definition of “correctly”.
You can also adjust indentation without leaving Insert mode. The Control-t
and Control-d keybindings will indent and dedent the current line while
inserting text. The mnemonics are “add tab” and “dedent”.
14.6. Reflowing Text
I’ve used the gw command a lot while writing this book. It effectively
rewraps (w for wrap) all the text at the eighty character limit (or any ruler
number, configurable with :set textwidth=<number>), without breaking words.
Most often, I use gww to rewrap the current line so that it has linebreaks at
the appropriate position or gwip to rewrap an entire paragraph. But gw
works with any motion or visually selection. To rewrap an entire file, use
gwig.
This command relies heavily on the existence of newlines. Effectively, any two consecutive lines will be joined into a single line (if they fit in 80 characters). For me, this has meant that if I forget to put a newline after a heading, my first paragraph gets tied up into the heading, which is obviously not what I want.
14.7. Filtering Through External Programs
You can also pipe text out to any external program that is a good Unix citizen:
one that processes input on STDIN and outputs it to STDOUT. To do so, visually
select the text you want to pipe in Visual mode. Then type a !. This will
open the command window with the visual selection as a range, and is a shortcut for
:'<,'>!. Then type a command on the path and the selected text will be
replaced with the output of that command.
Here are some examples, assuming some common Unix tools are installed:
!grep -v awill replace the selection with the same text, but any lines that contain the letter “a” will be removed.!tr -s ' 'will call the translate command, replacing all instances of multiple spaces with a single space.!jqwill format thejsontext withjq!pandoc -f markdown -t htmlis a handy way to quickly write HTML by starting with simpler Markdown syntax.!./my-custom-scriptwill pipe the command through an arbitrary script you wrote.!python ./something.pywill pipe the command through a Python script you wrote.
If you want to run a command without modifying the text, don’t supply a
range. For example, :!mkdir foo will run the mkdir command without
overwriting your file content. |
I think it is unfortunate that this feature is not used more. Many features
that are built into Neovim or supplied as plugins could just as easily be CLI
programs that operate on piped input and output. As just one example, the
:sort command that ships with Neovim is, in my opinion, just bloating the
editor when !sort can run the external sort utility just as well.
14.8. Spell Check
You can enable or disable spell check with <Space>us. When enabled, words
that are not recognized by the spell checker are underlined with a curly
underline similar to a diagnostic. But you have to jump between spelling
errors with [s and ]s instead of the diagnostic keybindings [d and ]d.
To ask Vim to give you suggestions for how to spell the word, use z=. This is
about as unmemorable as you can get, so write it down. If you can remember it
is in the z menu rather than Space, you can at least find it in the menu
again. The spelling suggestions will pop up in a numbered menu; enter a number
to replace the word with that spelling.
14.9. Insert Mode Keybindings
If you are in Insert mode, and want to perform a single Normal mode action
before going back to Insert mode, you can use ctrl-o. Perform the one Normal
mode command, and you’ll be back in Insert mode immediately. I don’t really see
the point of this, since Control-o<command> adds two keypresses, and so does
<Escape><command>i.
While in Insert mode, if you press Control-a, it will Insert whatever text
you inserted in the previous Insert mode session. This is similar to accessing
the ". register.
To access other registers in Insert mode, use Control-r. This will pop up the
registers menu and you can Insert any of those registers by hitting the
appropriate key. So Control-a in Insert mode is similar to Control-r.. To
insert from the clipboard, use Control-r and then +.
The CTRL-U keybinding will remove all characters on the current line that
were added since you entered Insert mode. So in a single line edit, it’s
similar to an Undo operation, but if your Insert has included an <Enter>, the
undo would only be on one line.
Some people like to bind to an unusual sequence of characters in Insert mode.
The most common suggestions are to bind jk to Escape or to bind ;; to
Control-O but you can do any combination you like. The former allows you to
switch to Normal mode without pressing Escape or Control, and the latter
allows you to temporarily perform a single Normal mode operation and return
to Insert mode. They don’t save you any keypresses in terms of count, but they
are easy keys to hit.
If you want to explore this, open your keymaps.lua file and add the following
lines:
Listing 46. Insert Mode Keymaps
vim.keymap.set("i", "jk", "<Esc>", { desc = "Normal mode" })
vim.keymap.set("i", ";;", "<C-o>", { desc = "Normal mode single operation" })- NOTE
If you like the
jkaction to leave Insert mode, themax397574/better-escape.nvimplugin will eliminate the delay that happens every time you pressjin Insert mode.
The important bit here is the "i" as the first argument. This tells Neovim
that the keymapping should happen in Insert mode instead of Normal mode
("n"). You can also use "o" for operator pending mode and v for visual
and select modes, among others.
In normal text and coding, the ; key is rarely followed by any character
other than <Space> or <Enter>, so it is a good candidate to use as a prefix
for a variety of Insert mode operations. |
Do not use this technique for expanding a sequence of text to a different sequence of text, though. For that, you are better off using either abbreviations or snippets, the topic of the next two sections.
14.10. Abbreviations (and Filetype Configuration)
Vim abbreviations have been around since the earliest days of the editor. They are an easy way to have “shortcut” words that expand to something else entirely without leaving Insert mode.
To create a temporary abbreviation, just use the command :iabbr <shortcut>
<expansion>. You can use Vim’s keybinding syntax to represent special
characters like <Enter>, and <Tab> in the expansion. You can even use
e.g. <Left> to reposition the cursor within the abbreviated text.
For example, consider this command:
Listing 47. Abbreviation Command
:iabbr ifmain if __name__ == "__main__":<Enter>main()<Left>`It will expand the text (when entered in insert mode) ifmain<Space> to the
following, and place the cursor inside the parentheses after main:
Listing 48. Suggested If Main Expansion
if __name__ == "__main__":
    main( )
The i in iabbr means it will work in Insert mode, and abbr is short for
“abbreviate.”
Note that I didn’t have to explicitly add any indentation after the Enter
because the Python indentation engine takes care of that for me. Note also
that the <Space> I typed after ifmain was inserted between the brackets.
If you need to expand an abbreviation without adding spaces, use the Control-]
keybinding to trigger expansion instead.
And if you need to insert the words ifmain without expanding them, type
ifmain<Escape> to return to Normal mode without expanding.
This abbreviation will only exist until I close the editor. To make it
permanent, I need to add it to my LazyVim configuration. Typically,
abbreviations only make sense within the context of a single filetype, so I
collect mine in the autocmds.lua using syntax like this:
Listing 49. If Main Abbreviation
vim.api.nvim_create_autocmd("FileType", {
  pattern = { "python" },
  callback = function()
    vim.cmd('iabbr ifmain if __name__ == "__main__":<Enter>main()<Left>')
    vim.cmd("iabbr frang for i in range():<Enter><Esc>F(i")
    -- Other Python abbreviations
  end,
})
The frang abbreviation shows another neat trick: You can use the string
<Esc> to enter Normal mode and move the cursor. I used F( to “find the
previous open paren” followed by i to enter Insert mode inside the range()
parens.
Vim abbreviations have been around forever and do the job well. I still use them (probably because I am old), but the world has largely moved on to snippets instead.
14.11. Snippets
LazyVim ships with the blink.cmp plugin, which provides the high-speed
completions interface we’ve seen before. Among other completions, it connects
to Neovim 0.10’s built-in snippets functionality. It can load
VS
Code-style snippets.
By default, blink.nvim pops up a simple menu with a bunch of
completions as you type. For example, here’s what I see if I type if
in a Python file:
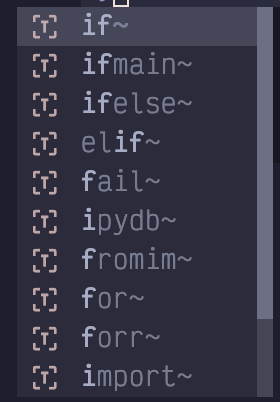
Figure 73. Cmp Menu
ifThe list shows possible completions. I can move my cursor up and down the list
with the arrow keys or Control-n and Control-p (j and k won’t work
here because I’m still in Insert mode). Most completions have a preview box
pop up with documentation or an example of the completion.
| I temporarily disabled the LSP to hide non-snippet results in this screenshot. |
This snippet was created by the FriendlySnippets plugin, which is a massive
collection of useful snippets that ships with LazyVim. (Also, notice that there
is an ifmain snippet much like the abbreviation I apparently didn’t actually
need to define above!)
If I then press the Control-y key, which confirms a completion (or Enter if
you use the LazyVim defaults or Right Arrow if you have configured
blink.cmp the way I have), the snippet is inserted into my editor:

Figure 74. Inserted Snippet
The editor is currently in “Select” mode, an uncommon mode that is superficially similar to Visual mode. In LazyVim’s default config, I’m not aware of any way to get into Select mode other than accepting a snippet! So we won’t go into detail about this mode outside the context of snippets.
The key point is that “condition” is currently highlighted, and I can start
typing immediately to overwrite it, almost as though I was in Insert mode. Once
the condition has been replaced, I can press the <Tab> key, which, in Select
mode, means “jump to the next field in the snippet.” Now the pass inside
the if is highlighted instead.
The <Tab> key only works like this if nvim-snippets is aware it is in a
snippet that has fields.
14.11.1. Defining New Snippets
If the FriendlySnippets snippets aren’t enough for you, you can define your
own snippets using the now-ubiquitous VS Code Snippet syntax and load them in
nvim-snippets. As a quick example, here’s how to create a snippet for a
boilerplate Svelte component:
If it doesn’t exist, create the
~/.config/nvim/snippets/directory to hold your snippets. This is the default locationblink.cmplooks for snippets.Create the
~/.config/nvim/snippets/package.jsonfile if it doesn’t exist. It needs to contain a list of all snippet files. In this case, we’ll be addingsvelte:Listing 50. Snippet package.json{ "name": "personal-snippets", "contributes": { "snippets": [ { "language": "svelte", "path": "./svelte.json" } ] } }The language for a given filetype can be found by opening a file of that type and entering the
:set ftcommand.Create a
jsonfile that matches the path i.e.svelte.json. Give it the following contents:
Listing 51. Snippet Definition
{
  "Boilerplate Component": {
    "prefix": "<scri",
    "description": "Basic svelte boilerplate",
    "body": [
      "<script lang=\"ts\">",
      "  $1",
      "</script>",
      "",
      "${2:<div></div>}",
      "",
      "<style>",
      "  $3",
      "</style>"
    ]
  }
}
If you are unfamiliar with VS Code snippet definitions:
prefixis the string you type in Insert mode to trigger the snippet. In this case, it is<scr.descriptionis a string that describes it in the preview pain.bodyis a list of lines in the snippet.$1,$2,$3represent “tab stops” in the snippet.${2:<div></div>}represents a tab stop with placeholder content (after the:) that can be typed over.
If I restart Neovim and load a svelte file, I can type <scri to insert this snippet. The
default output looks like this:
Listing 52. Snippet Output
<script lang="ts">
</script>

<div></div>

<style>
</style>
14.12. Summary
This chapter introduced various editing tips, starting with word counts and transposing characters, and then moving on to managing comments, indentation and formatting.
Finally, we covered the old-but-not-busted abbreviation syntax and the new-hotness Snippets engine that LazyVim ships with.
In the next chapter, we’ll start discussing something completely different: version control in LazyVim.