
Chapter 18. Testing
LazyVim can be configured with the Neotest plugin, a generic runner for selecting and running tests in a variety of languages and test frameworks. As with the debug adapter, Neotest is not enabled by default. However, if the plugin is enabled, most language extras ship with a pre-configured setup to make testing work automatically.
Except when it doesn’t, of course. Much like debuggers, I find the in-editor features provided by testing extensions (regardless of editor) to be too finicky to be worth the effort of configuring them. I usually just have a test runner in watch mode running in a separate terminal, and that works well for me. I didn’t previously use Neotest, but after writing this chapter I changed my mind!
18.1. Try Neotest
If you haven’t already (as part of enabling recommended plugins) pop open the
Lazy Extras interface and enable the test.core extra. This will set up
Neotest and a couple dependencies for you.
Also make sure that the extras for whatever language you are working on are
enabled, and double check if they include a test-related plugin. For this
example, we’ll be using neotest-python, which ships with the lang.python
extra.
Once the extra is enabled, you’ll see a new “test” top-level command in your
space-mode menu, accessible with <Space>t:
Figure 97. Test Menu
As you would expect, the easy-to-type <Space>tt is the most important command
in the menu; it runs the current file and parses the test results. You can also
use <Space>tr (r for “Run”) when your cursor is inside a test to run that
single test.
After running tests successfully, Neotest puts a couple check icons in your interface so that you can see that they were successful:
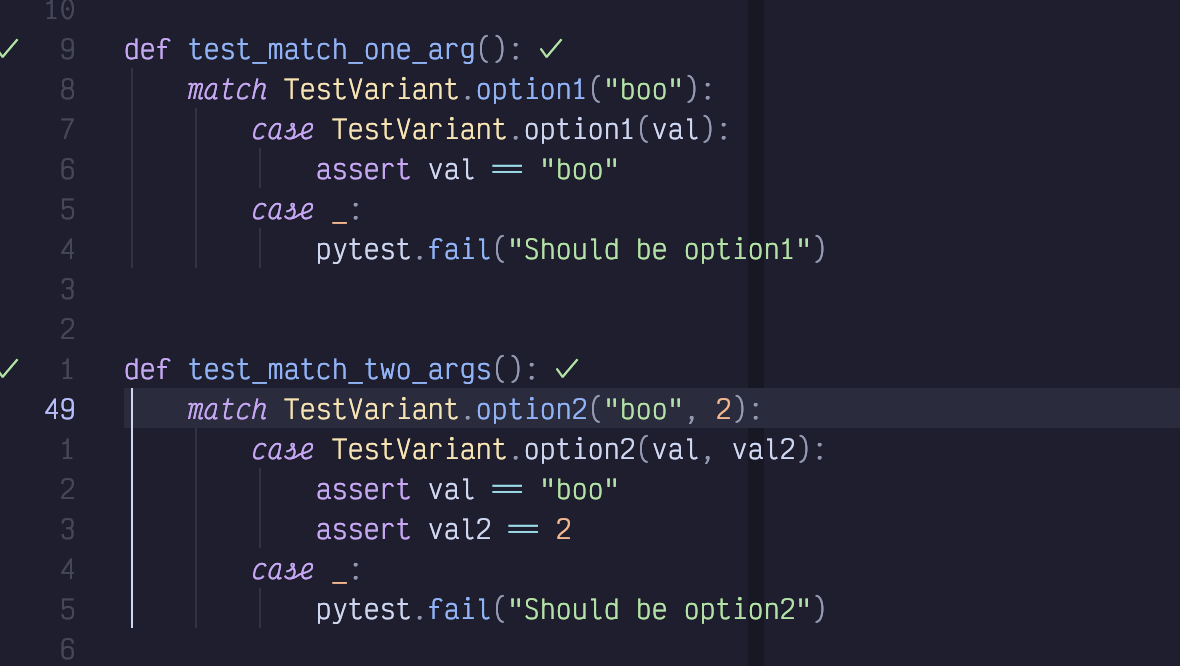
Figure 98. Tests Run Successfully
This screenshot of two tests was taken after I ran all tests in the file with
<Space>tt. There’s one checkmark in the gutter and another to the right of
the test in virtual text.
18.2. Error Reporting
Things get a bit more interesting when we introduce a test failure. First,
a scrollable window pops up with the test output; this is the same output I would
see if I had run the test command (pytest in this case) from the terminal:
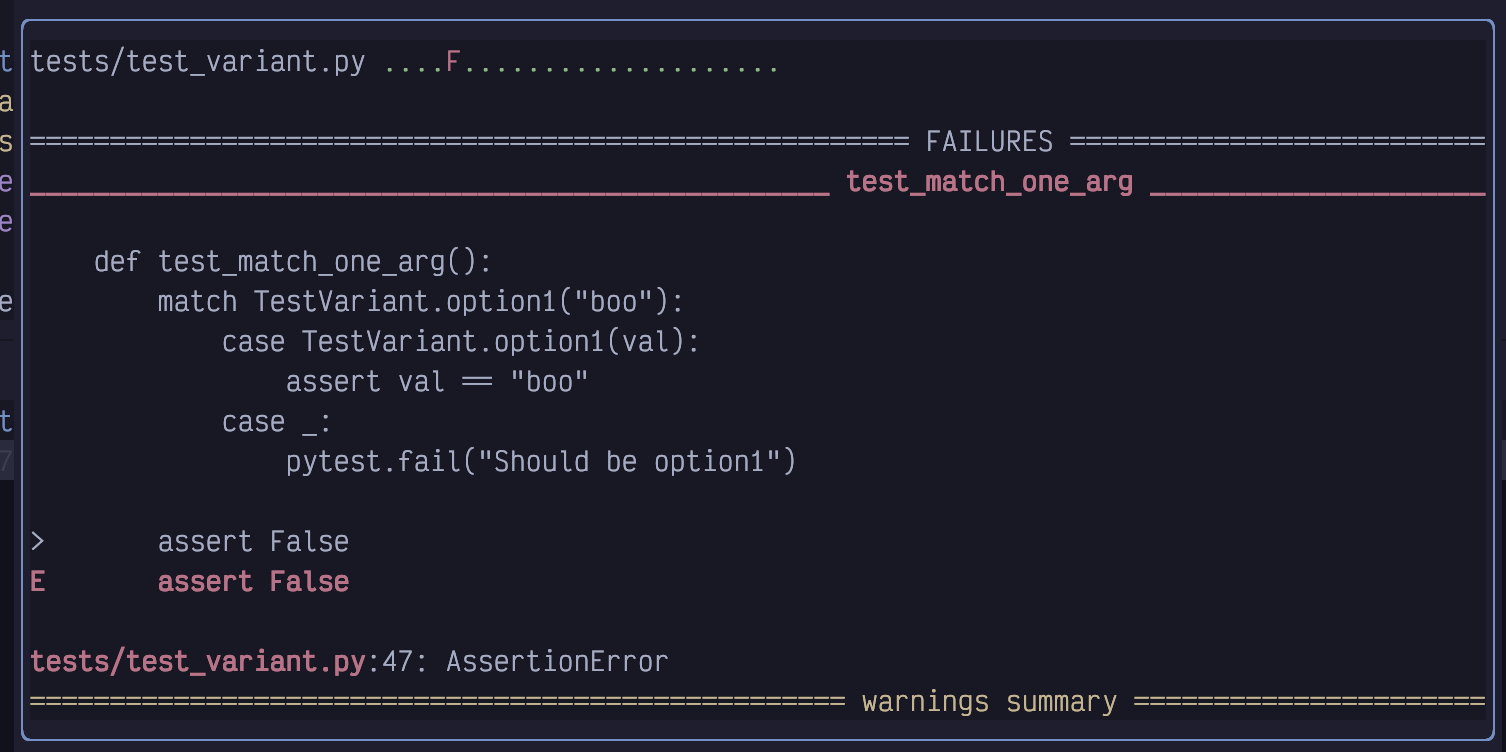
Figure 99. Test Error Output
When this window pops up after running tests, it isn’t focused by default, and
you can close it simply by moving the cursor (similar to a diagnostic window).
If you would prefer to focus the window (for example, so you can scroll it with
<Control-d> and <Control-u>), you can use <Space>to where o means
“output”. You can use this keybinding to show the most recent test output at
any time. Or you can use <Space>tO (capitalized O) to open the output in a
pane under the editor instead of a floating window.
| The Neotest Output pane will behave better if you also have the edgy Extra enabled. |
Once the floating window is focused, you need to use the q shortcut to exit it.
When a test in Neotest fails, you obviously don’t see a checkmark beside the test. Instead, you see a little red X. In addition, there will be an x in a circle in the specific line that has a failure and some (hopefully) informative virtual text to the right of the offending line:
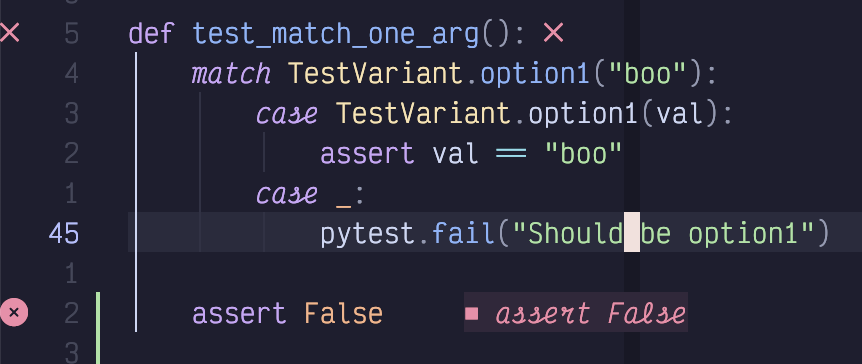
Figure 100. Test Error Virtual text
Most helpfully of all, a Trouble window will open with a list of all failing tests.
In this screenshot, I’ve added assert False to two different tests in the file:

Figure 101. Failing Tests In Trouble
This is super convenient because I can now navigate between failing tests
(possibly in multiple files) using ]q and [q, or by focusing the Trouble
window and using basic cursor movements.
18.3. Test Summary
The <Space>tT with a capitalized T does a “but bigger” style action,
running all tests in your project instead of just the ones in the current file.
Of course, you won’t see the test markers for any files that aren’t open. So
you’ll probably want to use <Space>ts to toggle the summary window:
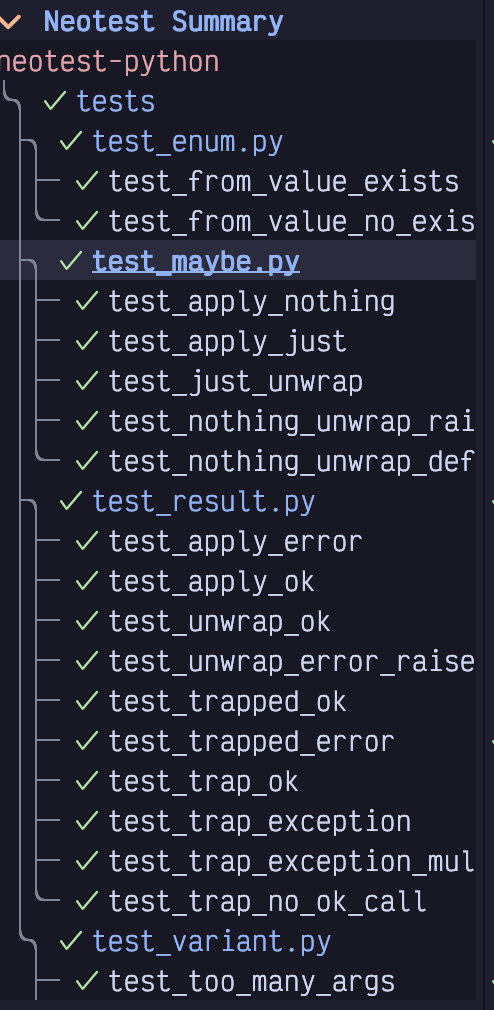
Figure 102. Test Summary
The summary view has some useful keyboard shortcuts (J and K are most useful) that
you can see by typing ? while it is focused:
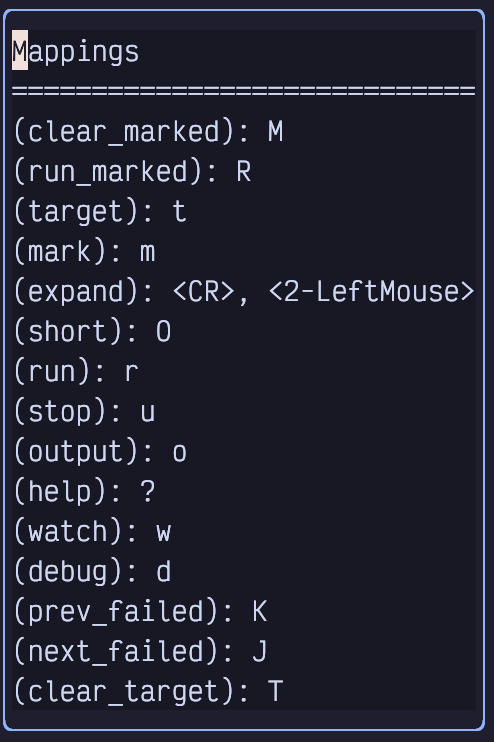
Figure 103. Test Summary Keyboard Mappings
The m for “mark” command deserves a callout. It allows you to mark a test
as “of interest”, so that when you use the R or Run marked command it will
only run those tests. Use M (capitalized) to clear all marks or m while a
line is marked to toggle a single mark off.
18.4. Watch Mode and Debugging
You can toggle “watch” mode for the current file using <Space>tw. This will
automatically run the test command every time your source code changes. The
summary and test file icons will all update in real time.
If you have enabled the debug adapter as described in Chapter 18, you can even
have the test automatically add a breakpoint on failure by running it with
<Space>td. This can be useful for quickly inspecting locals or adding watch
statements instead of adding a bunch of print statements before an assertion.
18.5. Installing a Test Runner
If you’re lucky, your language has a LazyVim extra that is preconfigured to
work with Neotest. For example, the lang.go, and lang.python extras both
include configuration to set up Neotest with those frameworks.
Not all languages have a clear default test runner, however. For example, if you are coding in Typescript, you might prefer vitest or jest or the deno test runner. All three of these have Neotest support, but none of them are enabled by default with the Typescript extra.
For such languages, you’ll need to do a bit of manual configuration. Let’s try to set one up for vitest as an example.
The plugin we need is neotest-vitest. We need to combine the instructions from the README in that repo with LazyVim’s example on the Neotest page.
I created a new vitest.lua file in my plugins directory and added the following
configuration to it:
Listing 67. Neotest-vitest Configuration
return {
  { "marilari88/neotest-vitest" },
  {
    "nvim-neotest/neotest",
    opts = { adapters = { "neotest-vitest" } },
  },
}
Then I restarted Neovim and opened a file that had a vitest test in it.
<Space>tt did the right thing, and the plugin is configured.
In the repo I was testing, vitest was installed with npm, so no extra
installation was needed. In most cases I would expect the tooling that
Neotest plugins call into to be installed already when they access your
project. If not, you may be able to install it from the Mason menu,
accessible from <Space>cm.
18.6. Writing Your Own Test Adapter
This is a bit out of the scope of this book, but I decided to include it because a) I needed to do it anyway, b) this chapter is suprisingly short, and c) it’s a good example for writing a simple plugin.
Writing your own Neotest adapter requires implementing just five methods to
match the neotest.Adapter interface. However, the devil is in the details.
For this example, I’ll be writing a test adaptter for the Bun test runner. I chose Bun partially because a Neotest adapter for it doesn’t exist and I use Bun in my own projects. But it’s also a good choice for demonstration because there are already three Typescript/Javascript Neotest adapters we draw on for examples and inspiration:
We won’t be implementing all the possible features (notably, the debugger will be missing), but we’ll get the basics of running Bun tests and parsing output.
If you are unfamiliar with Bun, it is a Javascript/Typescript runtime and
compiler, more or less an alternative to nodejs. The built-in command bun
test runs a jest-like test suite. It is this command we will be binding to.
18.6.1. Initializing a Local Plugin
By default, LazyVim downloads plugins from a provider such as GitHub. However, you can pass it any git url or point it at a local directory. We’ll be doing the latter.
First, let’s initialize a basic plugin structure in a new directory. You’ll need to make three nested directories:
Listing 68. Neotest Bun Mkdir
$ mkdir -p neotest-bun/lua/neotest-bunThe first neotest-bun can actually be any name. The lua is required for
LazyVim to pick up any files inside it, and the last neotest-bun is a lua
module that we will import in our configuration.
Inside this directory, create a file named init.lua. The contents of the file
can just be some simple Lua code for now:
Listing 69. Simple Lua Script
print("Hello, Lua!")The next step is to hook this local plugin up to our LazyVim configuration.
Create a new file in your LazyVim plugin directory (I called mine
neotest-bun.lua). We’ll use the same format we used for vitest above,
except we’ll point to our local plugin with the dir key:
Listing 70. Local Plugin Configuration
return {
  { dir = "~/Desktop/Code/neotest-bun/" },
  {
    "nvim-neotest/neotest",
    opts = { adapters = { "neotest-bun" } },
  },
}
To see if it’s working so far, open any file in Neovim and run <Space>tt to
attempt to kick off the test runner. It will fail because we haven’t properly
implemented the adapter interface, but it should also pop up a notification
that says, “Hello, Lua!”.
The notification will disappear quickly, which is very inconvenient if it
contains a traceback you want to introspect. You can always use <Space>sna
to show all the recent messages in a pane. The :messages command also
works. |
18.6.2. Implementing the Neotest Adapter
Let’s flesh out the adapter interface. Open the neotest-bun/init.lua file and
replace the print statement with the following content:
Listing 71. Neotest Adapter Interface
local BunNeotestAdapter = { name = "neotest-bun" }

function BunNeotestAdapter.root(dir) end

function BunNeotestAdapter.filter_dir(name, rel_path, root) end

function BunNeotestAdapter.is_test_file(file_path) end

function BunNeotestAdapter.discover_positions(file_path) end

function BunNeotestAdapter.build_spec(args) end

function BunNeotestAdapter.results(spec, result, tree) end

return BunNeotestAdapter
This is the interface we need to implement. If you’re wondering where I got
this, it is defined in
the Neotest source code
and linked from the Neotest README. I also have the GitHub repositories for the
neotest-jest and neotest-deno packages open for reference.
You’ll need to exit Neovim and restart it to pick up any changes you make to
the init.lua file. Remember that you can use the <Space>qq command to exit
Neovim and then the s command from the dashboard to restore your setup
with a minimal amount of fuss. |
If you try to run tests on a Bun test file now, it will (probably) fail with a “No Tests Found” message. If it doesn’t, there may be another test runner installed that thinks this is a legit test file.
Our adapter is currently correctly reporting that it is a Neotest adapter, but then it is failing to register the current folder or file as a test file. We can fix that by implementing the first three methods in the file.
The root directory is supposed to find the project root given a current
directory. When using Bun, we can use the presence or absence of a bun.lock
file as an indicator of the current project root. This file is generated when
you run bun install and is used for keeping track of dependencies.
So let’s implement the BunNeoTestAdapter.root method like this:
Listing 72. Root Directory Implementation
local lib = require("neotest.lib")

local BunNeotestAdapter = { name = "neotest-bun" }

function BunNeotestAdapter.root(dir)
  return lib.files.match_root_pattern("bun.lock")(dir)
end
The key here is the neotest.lib function match_root_pattern. We import
that library and assign it to a local, then our root function just
needs to create a callback and call it.
While we’re at it, we can also implement the filter_dir function. This method
is designed to filter out directories that shouldn’t be scanned. In a Bun
project, this includes the node_modules folder. We definitely don’t want to
waste time scanning for tests in that folder!
Listing 73. Filter Directory Implementation
function BunNeotestAdapter.filter_dir(name, rel_path, root)
  return name ~= "node_modules"
end
Now if you restart Neovim and try to run tests with <Space>tT (that is a
capital T the second time) it will not show the “No Tests found” message.
It won’t do anything, but at least it won’t error. However, <Space>tt will
error, because it doesn’t know that we are currently in a test file. We
can address that from the is_test_file method.
In Bun, like most Javascript runtimes, tests are typically in a
something.test.js or somethingElse.test.ts file. So we can use the following
Lua function to check if we are in a test file:
Listing 74. Is Test File Implementation
function BunNeotestAdapter.is_test_file(file_path)
  return string.match(file_path, ".*.test.[tj]s$") ~= nil
end
If I open my cohere.test.ts file and run <Space>tt, I still get No Tests
found. It is identifying the file as a Bun test file, but it doesn’t know how
to look inside the file to find any tests.
18.6.3. Discovering Test Positions
Solving this requires implementing the discover_positions function, and that
is… complicated. Typically, you would write Treesitter queries that identify
namespaces and tests in the file. I suppose you could also write your own
parser or use string.match, but Treesitter’s parser is probably better than
anything we can write.
I don’t know anything about writing Treesitter queries, and I don’t particularly want to. So I’m just going to rely on the fact that Bun uses the same describe/test syntax that Jest uses, and I’ll copy the queries wholesale from the neotest-jest plugin!
It’s a pretty long bit of code that will likely be hard to read in book format, but I’ll include it here for completeness:
Listing 75. Borrowed Discover Positions Queries
function BunNeotestAdapter.discover_positions(file_path)
  local query = [[
    ; -- Namespaces --
    ; Matches: `describe('context', () => {})`
    ((call_expression
      function: (identifier) @func_name (
        #eq? @func_name "describe"
      )
      arguments: (arguments (
        string (string_fragment) @namespace.name
      ) (arrow_function))
    )) @namespace.definition
    ; Matches: `describe('context', function() {})`
    ((call_expression
      function: (identifier) @func_name (
        #eq? @func_name "describe"
      )
      arguments: (arguments (
        string (string_fragment) @namespace.name
      ) (function_expression))
    )) @namespace.definition
    ; Matches: `describe.only('context', () => {})`
    ((call_expression
      function: (member_expression
        object: (identifier) @func_name (
          #any-of? @func_name "describe"
        )
      )
      arguments: (
        arguments (string (string_fragment) @namespace.name
      ) (arrow_function))
    )) @namespace.definition
    ; Matches: `describe.only('context', function() {})`
    ((call_expression
      function: (member_expression
        object: (identifier) @func_name (
          #any-of? @func_name "describe"
        )
      )
      arguments: (arguments (
        string (string_fragment) @namespace.name
      ) (function_expression))
    )) @namespace.definition
    ; Matches: `describe.each(['data'])('context', () => {})`
    ((call_expression
      function: (call_expression
        function: (member_expression
          object: (identifier) @func_name (
            #any-of? @func_name "describe"
          )
        )
      )
      arguments: (arguments (
        string (string_fragment) @namespace.name
      ) (arrow_function))
    )) @namespace.definition
    ; Matches: `describe.each(['data'])('context', function() {})`
    ((call_expression
      function: (call_expression
        function: (member_expression
          object: (identifier) @func_name (
            #any-of? @func_name "describe"
          )
        )
      )
      arguments: (arguments (
        string (string_fragment) @namespace.name
      ) (function_expression))
    )) @namespace.definition

    ; -- Tests --
    ; Matches: `test('test') / it('test')`
    ((call_expression
      function: (identifier) @func_name (
        #any-of? @func_name "it" "test"
      )
      arguments: (arguments (
        string (string_fragment) @test.name
      ) [(arrow_function) (function_expression)])
    )) @test.definition
    ; Matches: `test.only('test') / it.only('test')`
    ((call_expression
      function: (member_expression
        object: (identifier) @func_name (
          #any-of? @func_name "test" "it"
        )
      )
      arguments: (arguments (
        string (string_fragment) @test.name
      ) [(arrow_function) (function_expression)])
    )) @test.definition
    ; Matches: `test.each(['data'])('test')
    ((call_expression
      function: (call_expression
        function: (member_expression
          object: (identifier) @func_name (
            #any-of? @func_name "it" "test"
          )
          property: (property_identifier) @each_property (
            #eq? @each_property "each"
          )
        )
      )
      arguments: (arguments (
        string (string_fragment) @test.name
      ) [(arrow_function) (function_expression)])
    )) @test.definition
  ]]

  local positions = lib.treesitter.parse_positions(
    file_path, query, {
    nested_tests = false,
  })

  return positions
end
Now you can restart Neovim and open a bun test file to get a new error! New errors are progress, right?
You’ll now notice that Neotest is identifying the positions of describe and
test calls in the gutter. Instead of the red cross or green check we would
expect from a successful test run, it will be an eye with a cross through it. I
suspect this means the test was skipped or not runnable. The good news is it is
finding the tests. The bad news is it is not running the tests.
18.6.4. Building the Spec
We can run the tests by implementing the build_spec function. This function
accepts various parameters to determine how the user kicked off the tests.
If they used <Space>tr it’s in “single test” mode, but if they used <Space>tt
it is in “file” mode, and <Space>tT would run it in “all tests” mode.
The return value of build_spec is essentially a command to be run and some
context to read the results back.
The code is actually not that long, so here it is in its entirety, followed by discussion:
Listing 76. Build Spec Implementation
function BunNeotestAdapter.build_spec(args)
  local results_path = async.fn.tempname()
  local position = args.tree:data()
  local cwd = assert(
    BunNeotestAdapter.root(
      position.path
    ),
    "could not locate root directory of " .. position.path)
  local command = nil

  if position.type == "test" or position.type == "namespace" then
    command = "bun test " ..
      position.path ..
      " --test-name-pattern " ..
      position.name
  elseif position.type == "file" then
    command = "bun test " .. position.name
  elseif position.type == "dir" then
    command = "bun test"
  end

  return {
    command = command .. " 2>" .. results_path,
    context = {
      results_path = results_path,
    },
    cwd = cwd,
  }
end
We start by creating a temporary results_path using the neotest.async library.
(You’ll need to import this with local async = require("neotest.async") at
the top of the file). We load the position, which is a structure constructed
from the return value of the discover_positions method we just wrote.
The if..elseif block is essentially checking how the user kicked off the
test, and running the appropriate Bun command. If they provided a test name,
then we pass the --test-name-pattern argument to the bun test command. If
they kicked it off as a file, we run bun test filename. And if they
wanted to run all tests, we simply run all tests with bun test.
The Bun test runner is so fast, that I would expect to mostly just use
the last form with <Space>tT and the summary view open in the left sidebar. |
The returned object includes some necessary context that will be used when we
parse results. The bun test command is rather unusual in that it outputs the
results to standard error, so we pass a 2> redirect to store the results in
the temporary file we defined.
Now we just need to extract the results from that file.
18.6.5. Parsing Results
This ended up being simpler than I expected, because bun test aggregates
names in a way that maps to Neotest’s expected form quite easily. But it
took me half a day of fussing around to get code that actually worked!
The results method mostly just has to read through the results_path file
that was created by our build_spec function and convert it to a simple Lua
table. The keys of the result table are the names of the tests in question, and
the values are just a second table with {status = "passed"} or {status =
"failed"}. At least, that’s all we’re going to put in it. Neotest does accept
some other details here that it can render in the UI, but I’ll leave that as
“an exercise for the reader.”
| When reading other instructional books, “an exercise for the reader” is just authors being lazy, or (occasionally) publishers trying to cut word count. Now you know. |
The tricky part is the “keys are the names of the tests”. I couldn’t find any
documentation on this, and it took some trial and error to discover that nested
“namespaces” (describe calls, in this case) in Neotest are separated by
::. The name also needs the absolute path to the test file. If we return that
in the right format, Neotest will happily convert our results to the
appropriate icons!
Here’s the code:
Listing 77. Neotest Results Implementation
function BunNeotestAdapter.results(spec, result, tree)
  local results = {}
  local file = assert(io.open(spec.context.results_path))
  local line = file:read("l")
  local test_suite = ""

  while line do
    local pass_match = string.match(line, "^%(pass%) (.*) %[.*%]$")
    if pass_match ~= nil then
      local test_name = pass_match.gsub(pass_match, " > ", "::")
      results[test_suite .. test_name] = { status = "passed" }
    end

    local fail_match = string.match(line, "^%(fail%) (.*) %[.*%]$")
    if fail_match ~= nil then
      local test_name = fail_match.gsub(fail_match, " > ", "::")
      results[test_suite .. test_name] = { status = "failed" }
    end

    local test_file = string.match(line, "^(.+.test.[tj]s):$")
    if test_file ~= nil then
      test_suite = spec.cwd .. "/" .. test_file .. "::"
    end

    line = file:read("l")
  end

  if file then
    file:close()
  end

  return results
end
For context, this function is designed to translate output like this:
Listing 78. Bun Test Output
src/clients/stability/stability.test.ts:
(pass) Stability > generates a reference image [0.40ms]

src/clients/passage/passage.test.ts:
(pass) Passage > GetUserTier > Undefined [1.24ms]
(pass) Passage > GetUserTier > with tier free
(fail) Passage > GetUserTier > with tier hobby
into something like this:
Listing 79. Translated Bun Test Output
{
  "/.../stability.test.ts::Stability::generates reference image" = {
    status = "passed"
  },
  "/.../passage.test.ts::Passage::GetUserTier::Undefined" = {
    status = "passed"
  },
  "/.../passage.test.ts::Passage::GetUserTier::with tier free" = {
    status = "passed"
  },
  "/.../passage.test.ts::Passage::GetUserTier::with tier hobby" = {
    status = "failed"
  },
}
The method first grabs the filename from the context (the context was returned
from the build_spec method). It opens the file and reads the lines from that
file one by one. It then uses a matcher to determine if the line starts with
(passed) or (failed) which is how Bun reports a test result. The rest of
the test line will be the properly namespaced test name (minus a timing in
square brackets), except the namespaces are separated by > instead of ::.
So we use gsub to replace the > with ::. This is combined with the absolute
path of the name of the file to get the right test name.
If a given line is not a test name, then it might be the name of the test file,
which Bun kindly specifies as a relative path followed by a colon. So we do a
match on that format and store the test name as an absolute path (that’s what
the spec.cwd is for) to be prepended to subsequent test results.
And that’s the basics of implementing our own test runner! It’s missing some features, notably debugging tests and capturing output, but it’s a good start.
18.7. Summary
This chapter covered the Neotest plugin, including various ways to invoke it and how to set it up the easy way, hard way, and extra hard way.
We also learned a little bit about how to write a Neovim plugin. At its core, it’s just a collection of Lua files that LazyVim can import. In this case, the Lua file is a Neotest adapter, and we configured it to load our plugin into Neotest.