Chapter 2. What is Modal Editing, Anyway?
As the letters on the dashboard suggest, LazyVim is keyboard-centric. As many actions as possible can be performed without moving your hands between mouse and keyboard. Of course, it’s still possible to use the mouse. You can click anywhere in the editor, interact with buttons and modals when they pop up, use the scroll wheel or touchpad gestures to scroll, and resize editor panes by dragging their borders. But you can also do all of these things using the keyboard, and usually more efficiently.
More importantly, you can do most things by holding at most two keys, most
often only one. You will only rarely have to contort your hands into painful
(and dangerous) positions to Control + Shift + Alt + <some key>.
How does Vim do this? Modal editing.
2.1. Introduction to Modal Editing
“Modes” in LazyVim simply mean that different keystrokes mean different things depending on which mode is currently active. For example, when you start the editor up, you are in a “Dashboard Mode”, and the most common interpretation of each keystroke in that mode are listed right on the dashboard. This discoverability of keybindings in a given mode is a common theme in LazyVim, and a huge improvement over the opaque default behaviour of Neovim itself.
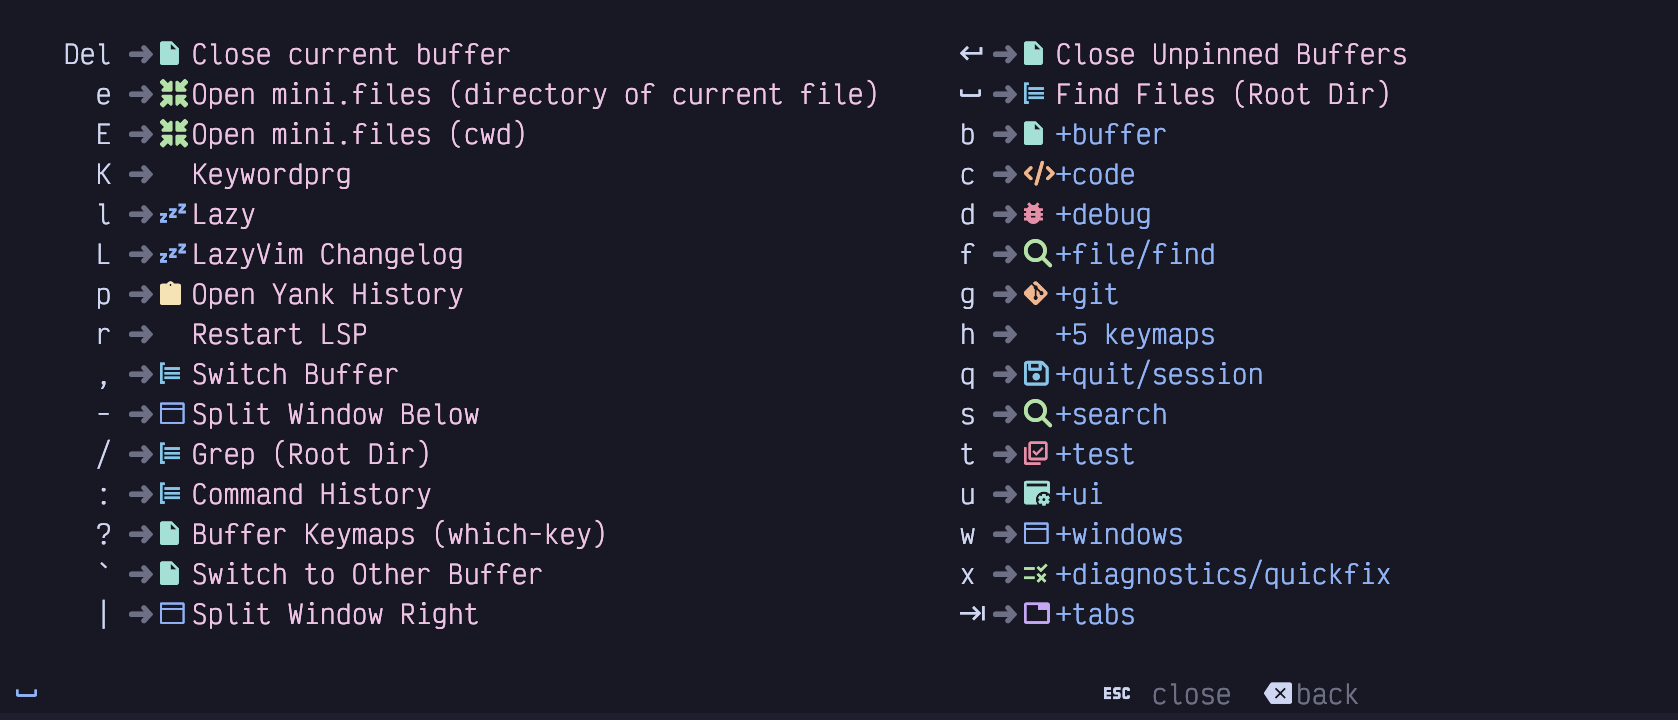
To see what I mean, press the spacebar to enter “Space mode”. Entering Space mode pops up a menu in the bottom right corner of the screen. It will look something like this (my menu contains some customizations, so yours won’t be identical):
Figure 4. Space Mode
That’s a big menu. The important thing to focus on right now is the f key,
which we will use to understand modal editing.
If you are in Dashboard mode and press the f key, you will open the Find
file dialog using a picker plugin we’ll discuss later. However, now that you
are in Space mode, if you press the f key, it will instead open the
file/find Space mode submenu.
This is the crux of what modal editing means: The behaviour of a given key
depends on the current mode. As indicated by the line at the bottom of
the Space mode menu, you can press the Escape key to exit Space mode
and return to the dashboard. Go ahead and do that.
Now you’re back in Dashboard mode, and you can press the n key to create
a new, empty buffer.
Pay close attention to the lower left corner of that buffer, where you’ll see
the word INSERT:

Figure 5. Insert Mode
While Space mode and Dashboard mode are technically LazyVim specific configurations, Insert mode is an original Vi concept, that the successors Vim, then Neovim, and now LazyVim have all inherited. In Insert mode, the vast majority of keystrokes do what you would expect in any editor: they insert text. So you can touch type as usual.
You can access some keyboard shortcuts in Insert mode using Control and
Alt keys. For example, you can hit Control-r to enter the “Registers”
mini-mode, which pops up a list of “registers” you can paste from. We’ll cover
registers in detail in Chapter 8. For now, it is enough to know that
Control-r followed by the plus key (i.e. Shift-=) will paste text from the
clipboard when in Insert mode.
However, you will much more often change to Normal mode to perform non-text-entry operations, including pasting text. Normal mode is another major Vim mode that has been around since the days of Vi.
To get into Normal mode from Insert mode, hit the Escape key. The cursor
will change from a bar to a block and the indicator in the lower left corner
will change to NORMAL:

Figure 6. Normal Mode
In Normal mode, pressing various keyboard characters will not insert text
like it does in Insert mode. For example, pressing p will, rather than
inserting a literal p character into the document, instead paste from the
system clipboard.
Vim and Neovim aren’t very discoverable, but they ARE generally memorable. As
often as possible, the keyboard shortcuts to perform an action start with
a letter that makes sense for the action being performed. You might think p
stands for “paste”, but in fact the concept has been around for longer
than the clipboard abstraction. You are welcome to think of it as “paste” if
that’s easier for you, but in Vim parlance, it actually stands for “put”, and
I’ll use that word throughout the book.
For some contrast, the Control-r key that pops up the list of registers in
Insert mode does not pop up a list of registers in Normal mode. Instead,
Control-r means “redo” (i.e. undo an undo). In order to enter the Registers
mini-mode from Normal mode, you would press the " (quote, as in
<Shift>-apostrophe) key instead.
If that sounds confusing, don’t worry. Your brain and muscle memory will adapt more quickly than you expect and you’ll always understand that behaviours in Normal mode are not the same as in Insert mode.
I hardly ever use non-text-entry commands in Insert mode. I find it is easier to switch back to Normal mode and then perform the command from Normal mode. It doesn’t usually take a higher number of keystrokes to do so and I don’t have to hold down multiple keys at once.
The universal key to exit Insert mode and return to Normal mode is Escape. And
that brings us to an important point: You will be using this key a lot, but
moving your hands from the home row to the Escape key in the upper left corner
and back again is somewhat inefficient.
You can choose from a few common solutions to this situation:
If you have a customizable keyboard you can put the
Escapekey in a more accessible location. This is what I do. I have a MoErgo Glove 80, and I remapped the keys so thatEscapeis in the “thumb key” section of this admittedly bizarre keyboard. It’s as easy to hit asEnter,Space, andBackspace, other keys that I use very frequently.Your operating system is probably also capable of remapping keys. A lot of modal users replace the useless
Capslockwith theEscapekey. (For non-modal paradigms it can be more comfortable to remapCapslockto the commonly-heldControlkey, especially on laptop keyboards).Neovim itself is also able to remap keys. We’ll discuss how to do this in LazyVim later. One common pattern is to map a series of uncommon keystrokes that you wouldn’t likely type together when inserting text to the escape key. So you can set it up to map something like
jk,jjor;;in Insert mode to switch to Normal mode. I’ve tried this and don’t care for it as it introduces a timing thing when you hit the first character and Neovim is waiting to see if you’re going to type a command or let text insertion continue, but you might like it.The
Control-Ckeyboard combination also works to exit Insert mode, with no remapping required. I don’t like this because it’s two keystrokes.
Don’t worry about actually changing it for now; just start getting used to
using Escape where it is and see if you find it annoying.
Once you’re in Normal mode, you’ll obviously want to get back to Insert mode to enter text at some point! There are several different ways to do this. Here are a couple of the most common ones:
The i key always inserts text before the current cursor position. This
means that you could (very clumsily) move your cursor left by pressing
i <Escape> i <Escape> repeatedly. When you press i, you insert text before
the current position, and then Escape takes you out of Insert mode at that new
“before” position.
Commonly, you want to enter Insert mode after the current cursor
position. To do that, use the a key instead (mnemonic: i for Insert Before,
a for Append, although I usually think of it as After).
You’ll find that you need to alternate between these a lot as you are navigating a document because the various navigation commands we’ll cover later will often put you just before or just after the position you need to insert at. So it’s important to remember both of them.
Two other very common operations are to insert at the very beginning or the
very end of the current line. You could use navigation commands to move to
the start or end and then use i and a, but it’s easier to use the commands
I and A instead (The difference is that they are capitalized, so you need
the Shift key with them).
2.1.1. A Note on Keybinding Mnemonics
It is common for related keybindings like these to be assigned to the lowercase
and uppercase versions of the same key. You will often find that the lower case
version means “do something” and the uppercase version means either “do the
same thing only BIGGER” or “do the OPPOSITE thing”, depending on the
situation. In this case, i and a mean “insert one character before or
after the cursor” and I and A are “insert before or after the cursor,
only BIGGER (i.e. at the beginning or end of the line)”.
To illustrate the “do the opposite thing” situation, consider the o and
(shifted) O keys, which are two more ways to get into Insert mode.
The o key is used to enter Insert mode on a new line below the current
one. For the “do the opposite thing” scenario, the shifted O means “create
a new line above the current one and enter Insert mode on it”.
The mnemonic “Open a new line above/below” can help you remember
the otherwise less than memorable o command. |
One final useful command that takes two keystrokes is gi. That is a single
press and release of g followed by i. It means “Go to the last place you
entered Insert mode, and enter Insert mode again”. In this case, the g key
is actually switching to a new mini-mode I call “Go To” mode, though not all
the commands accessible from it are strictly related to going places. You can
see the entire list of commands available in “Go To” mode by pressing the g
key in Normal mode and waiting for the menu to pop up at the bottom of the
window:
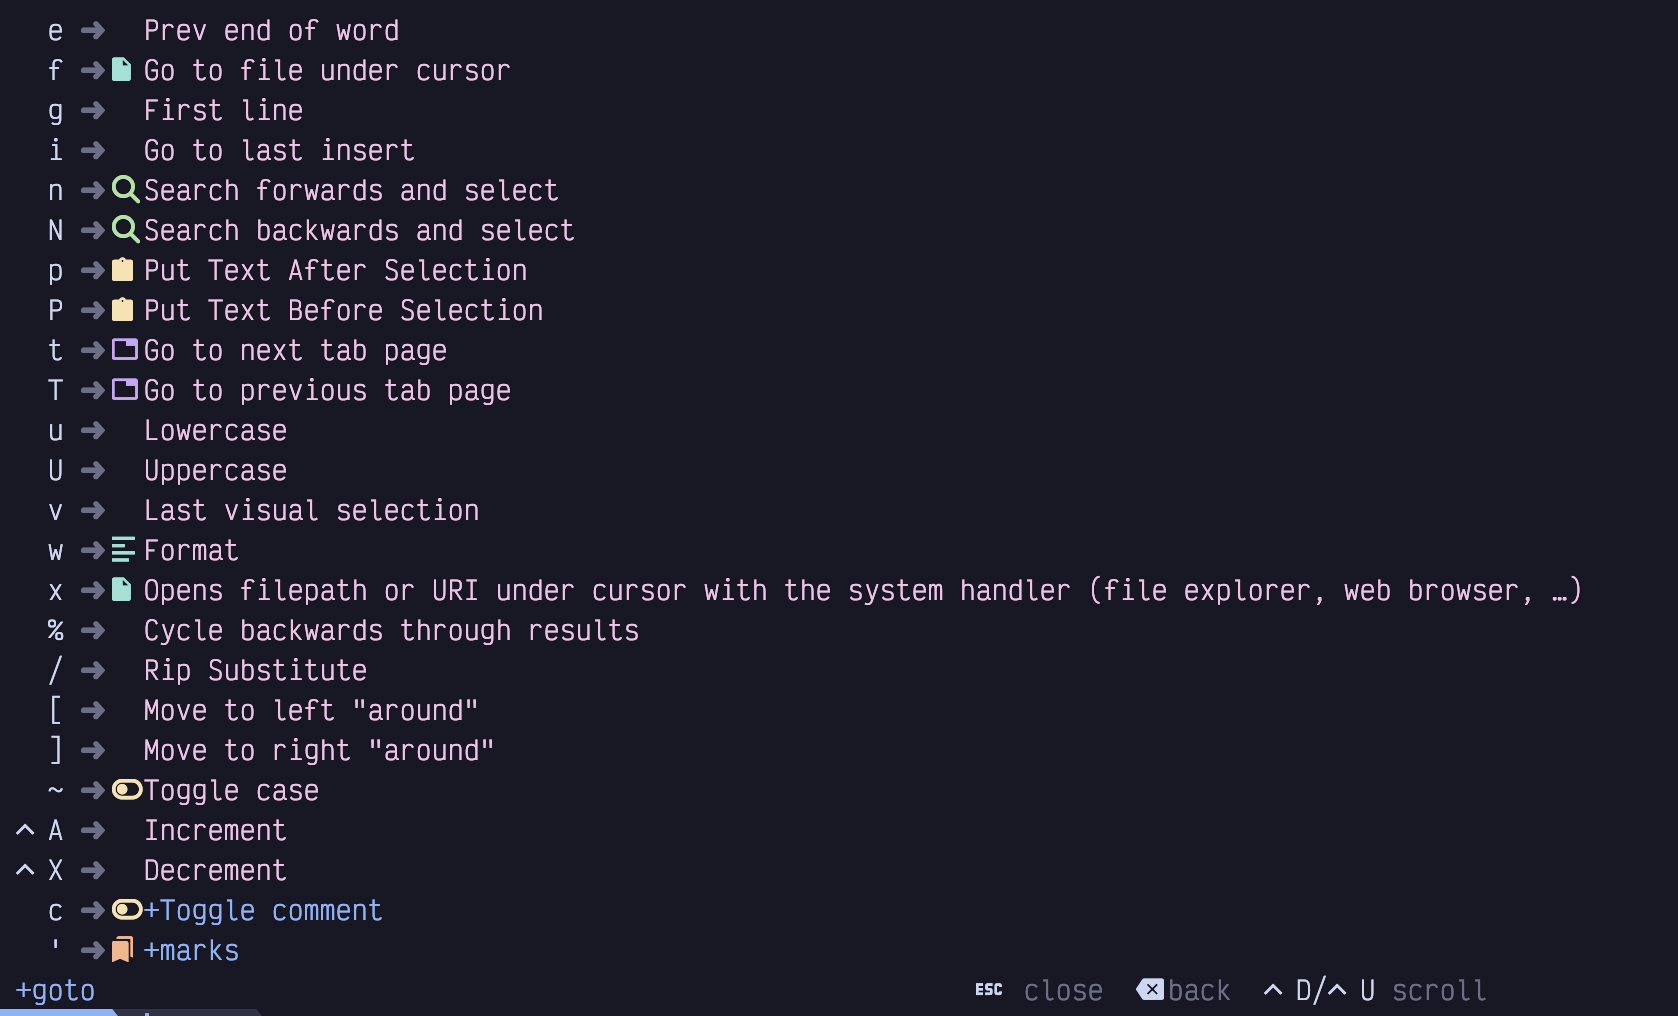
Figure 7. Go To Mode
We’ll cover most of them later, but notice that the i key is in there
labelled “Move to the last insertion and INSERT”. So if you forget how to go to
the last insertion point, you can enter Go To mode and scan the menu to find
the i again.
Try all of those commands (a, i, o, A, I, O, and gi) repeatedly,
entering some text and pressing Escape to return to Normal mode. Then try it
again. Move your cursor around the text using the mouse (we’ll get to keyboard
navigation soon, I promise), and try using the commands again to see how they
behave in new locations.
Get really comfortable with switching between Normal and Insert mode. You might think you’ll spend most of your time in Insert mode, but the truth is code is edited far more often than it is written afresh, and you’ll be alternating between them constantly.
2.2. Visual Mode
The other major mode that LazyVim inherits from its ancestors is “Visual” mode. Visual mode is used to select text. In general, you can enter Visual mode and then use many of the same navigation keys you would use in Normal mode to move your cursor around. Since we haven’t covered those navigation keystrokes yet, I’m going to defer a detailed discussion of Visual Mode until Chapter 8, when we will have the necessary foundation.
2.3. Command Mode
Command mode is different from the other modes we’ve seen, which were mostly
either submenus or the editor-level “major” modes. You can get into command
mode from Normal mode by using the : (i.e. Shift-<semicolon>) command. In
LazyVim, this will pop up a little widget where you can type what is known as
an “Ex Command.” This name comes from vi's predecessor, ex, which
hasn’t really been used (other than as part of Vim) in decades.
Essentially, you can enter a wide variety of commands into this widget and expect certain behaviours to happen as a result. It is actually more similar to the command palette popularized by Sublime Text and VS Code than anything else, though it is quite a different experience.
You already know one ex command from Chapter 1! Remember
<Escape><Colon>q!<Enter> the command to exit the editor? You now know that
the Escape is to enter Normal mode from whatever mode you are in. The colon
is used to switch to Command mode, and the q is short for quit (You could
type the full word quit if you didn’t feel the need to conserve keystrokes).
The exclamation point says “without saving" and the Enter means "submit the
ex command”.
As another example, let’s consider the write ex command. Type : followed by
write myfile.txt like this:
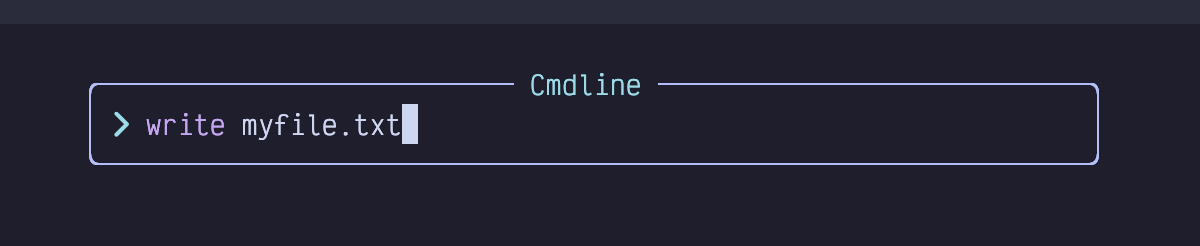
Figure 8. Write Command
Press Enter to confirm and execute the command, which will save the file with
the given name.
Most commands can be shortened to their shortest unique common prefix.
You usually type :w myfile.txt instead of :write myfile.txt. The most popular
commands even have special combined commands, so :wq will save and exit,
although you’ll probably prefer :x as it’s even shorter. |
Command mode is kind of weird. It’s like an Insert mode in the sense that you
can type text into it, and some of the keybindings that work in Insert mode
also work in Command mode (including Control-r to paste from a register). But
other keybindings work differently in Command mode. The most important one is
the Tab key, which will do a sort of “tab completion” on the command. For
example, :q<Tab> pops up a menu like this:
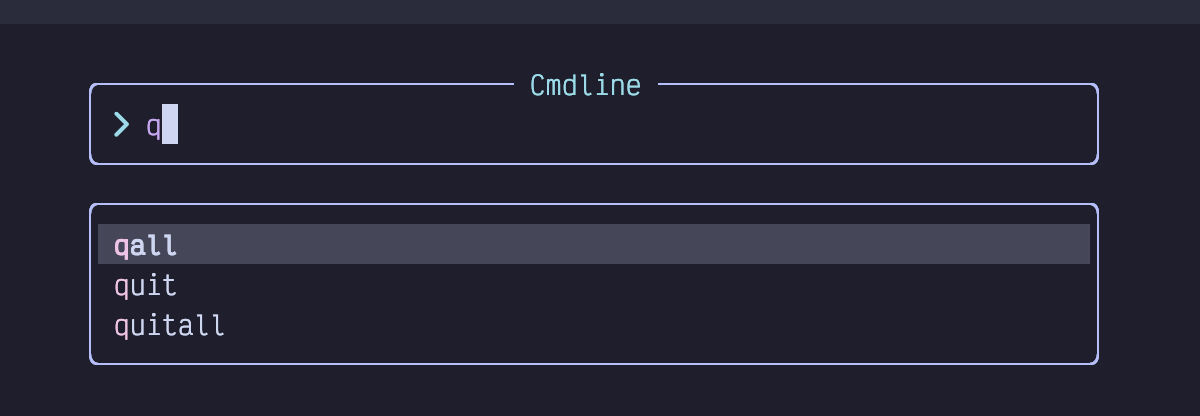
Figure 9. Tab in Command
This completion menu is disturbingly unintuitive to navigate. You’re probably going to want to bookmark this section or take some notes to refer to until you get used to it!
First, if you want to select a different entry in the menu, you would surely
think you can use the arrow keys, right? No, you’ll need to use Tab and
Shift-Tab to select different entries from the menu. It’s easier on the
muscle memory: Tab once to show the menu, tab again to cycle through other
entries in the menu.
Second, there is some nuance around confirming one of those menu entries.
In the above example, you can just press Enter to confirm the selection
and execute it. However, there are often cases where you want to confirm
the selection and then continue editing the command. An excellent example
is the :e or :edit command.
This command is used to open a file on your filesystem, but you have to type the entire path to the file. For example, if you have the following directory structure:
Listing 5. Nested Directory Structure
.
└── foo
    ├── bar
    └── baz
│ └── fizz.txt…and you have Neovim open, you would have to type the following to open the
fizz.txt file:
Listing 6. Edit File Command
:e foo/baz/fizz.txtThat’s a lot of typing if you need to get to deeply nested directories.
Luckily, you can use tab completion for this. You can type :e
f<tab>b<tab><tab><tab> to select foo/baz, but at this point the menu is still
open:
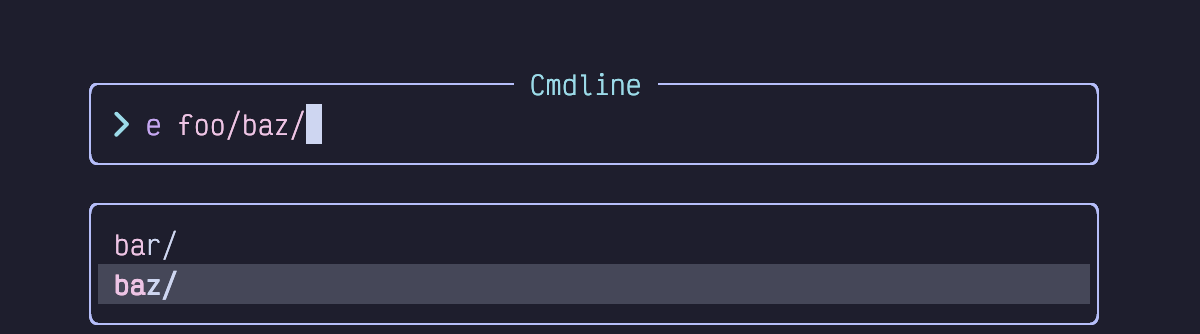
Figure 10. Edit Command with Completion Menu
If you press Enter now, it’s going to open the baz folder instead of just
confirming the selection, which is not what you want. And if you press Tab
again it will cycle through the menu some more.
Instead, you have a couple of options. The Down arrow key will
(unintuitively) move “into” the selected directory, allowing you to tab through
the files inside it. Alternatively, use the Control-y (y for “yes”) key
combination. This will confirm the baz selection and close the menu but leave
you in Command mode. Now you can press tab again to complete the fizz.txt
portion of the command.
It is possible to remap these keys to be more like other software, and I honestly think this is one thing LazyVim should do by default. I haven’t found a combination that I like, though, so I just stick with the default keybindings.
You probably won’t spend a lot of time in Command mode. There are easier ways to open files in LazyVim, for example, as well as to quit the editor. And if you need to do something more complex with command history, there is a special window you can use to edit commands with Insert and Normal mode that we will cover later.
For now, remember <Tab> and Control-y and you’ll be able to navigate the
Command menu when you need to.
The most important command, by the way, is :help. Vim was created before
folks had ready access to the Internet, so it has a tradition of shipping all
of its documentation with the editor. So for example, if you can’t remember the
keyboard shortcut to put text, try :help put. Or, if you want to know what
the Control-R keyboard shortcut does, try :help CTRL-R. Of course, the
Vim help documents have also been indexed by your favourite search engines and
AI chat bots, so you can go all new-school and ask them if you prefer.
2.4. Summary
In this chapter, we became comfortable with the concept of modal editing and the most important LazyVim modes. There are other mini-modes that will come up as we progress through this book, but becoming comfortable with Normal, Insert, and Command mode (and how to switch between them) will take you a long way on your LazyVim journey.
In the next chapter, we’ll learn a whole bunch of different ways to move the cursor around inside a document.