Chapter 3. Getting Around
Software developers spend far more time editing code than we do writing it. We’re always debugging, adding features, and refactoring.
Indeed, the most common thing I ever do is add a print/printf/Println/console.log at some specific line in the codebase.
If you are coming from the more common word processing or text editing ecosystems, navigating code is the thing that is most different in Vim’s modal paradigm. Even if you’re used to Vim, some of the plugins LazyVim ships by default provide different methods of code navigation than the old Vim standbys.
In VS Code, often the quickest way to get from one point in the code to another
is to use the mouse. For minor movements, the arrow keys work well, and they
can be combined with Control, Alt, or Cmd/Win to move in larger increments
such as by words, paragraphs, or to the beginning or end of the line. There are
numerous other keyboard shortcuts to make getting around easier, and the
Language Server support allows for easy semantic code navigation such as
“Go to Definition” and “Go to Symbol”.
Vim also supports mouse navigation, but you’ll likely reach for it less often once you train up on the navigation keymappings. LazyVim has keybindings for the same Language Server Protocol features that VS Code has, and they are often more accessible. The big difference with Vim is the entire keyboard’s worth of navigation commands that are opened up to you when your editor is in Normal mode.
3.1. Seeking Text
LazyVim ships with a plugin called flash.nvim, which was created by the maintainer of LazyVim and integrates very nicely with it.
This plugin provides a code navigation mode that has been available in various vim plugins for many years, and has historically been quite controversial. A lot of long-time Vim users think it breaks the Vim paradigm. I won’t go into the details as to why, but I will acknowledge that this was true in older iterations of the paradigm but is somewhat less true in modern versions such as flash.nvim.
If you can see the code you want to navigate to (i.e. because the file is currently open and the code is scrolled into view), flash.nvim is almost always the fastest way to move your cursor there. It admittedly takes at least three keystrokes, but those three keystrokes require no mental math or incrementally “moving closer” to the target until you get there, which are two of the less efficient problems that come up with certain other Vim navigation techniques (as well as in non-modal editing).
To invoke flash, press the s key in Normal mode. My mnemonic for s for
“seek”, although I’ve also heard it referred to as “sneak” or
“search” mode. Searching in LazyVim is a different behaviour (it doesn’t care
if the text is currently visible or not), and “sneaking” sounds a little too
dishonest, so I use “Seek”.
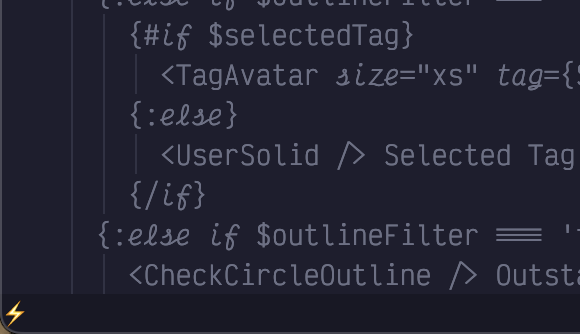
The first thing to notice when you press s is that the text fades to a
uniform colour and there’s a little lightning symbol in the status bar
indicating that Flash mode is active:
Figure 11. Flash Mode Active
Since you know where you want the cursor to be, your eyes are probably looking right at it, and you know exactly what character is at that location. So after entering Seek mode, simply type the character you want to jump to.
For example, in the following screenshot, I want to fix the typo in the heading
of this section, changing Test to Text.
Figure 12. Seek
s charactersI have hit ss, and every single s in the screenshot has turned blue,
including capitals. There is an s character beside the flash icon in
the status bar indicating that I have seeked an s.
In addition, all the s characters nearest to the cursor (which is in the
bottom paragraph) have a green label beside (to the right of) them. If I wanted
to jump to any of those s characters, I would just have to type that label
and boom, I’d be there.
However, the character I want to hit is too far away to have a unique label,
as there are a lot of s characters in my text. No matter! I just have to
type the character to the right of the target s character, which is a t. Now
my screen looks like this:
Figure 13. Seek
st charactersNow, all instances of st in the file are highlighted in blue, and since there
aren’t as many st as s, all of those instances have a label beside them.
The text I want to move to is labelled with a p, so I press p and my cursor
is moved to the s character I wanted to change. Now I can type rx to
replace the s with an x (we’ll discuss editing code in chapter 6, but now
you’ve had a taste of it).
If you have multiple files open in split windows (which we’ll discuss in Chapter 9), Seek mode can be used to move your cursor anywhere on the screen, not just in the currently active split.
Seek mode does have drawbacks however, at least the way flash.nvim implements
it. There are some characters you can’t move to directly because you run out of
text to search for before a labelled match targets that location. For me this
happens most often when I want to edit the end of a line. If I type sn
because I want to edit a line that has n as the last character, but there are
a bunch of n characters closer to my cursor than the one I want to move to,
flash may not label the n I want to move to, and it won’t accept a carriage
return as a “next character” input.
For this reason, I don’t seek near ends of lines. Instead, I’ll seek to a word
somewhere in the middle of the same line and then use A which, as you may
recall, will put me in Insert mode at the end of the line. Alternatively, if I
don’t want to enter Insert mode, I will use the $ symbol (Shift+4), which
is the Normal mode command for “Move cursor to end of current line”.
3.2. Scrolling the Screen
Seek mode only works if the text you want to jump to is visible on the screen. You can’t label something you can’t see! Often, this means you want to use search or one of the larger or more specific motions discussed later, but there are also a few keybindings you can use to scroll the screen so you can see your target before you jump to it.
These keybindings are a little unusual by Vim standards because they mostly involve using the control key. How anti-modal! In my experience, these keybindings don’t actually get a ton of use. Indeed I’ve forgotten some of them and had to look them up to write this chapter.
The scrolling keys I use the most are definitely Control-d and Control-u,
where the mnemonics are down and up. They scroll the window by half a
screen’s worth of text. The cursor stays in the same spot relative to the
window, which means that it is moved up or down by half a screen’s worth of
text relative to the document.
If you need to move even further, you can use the Control-f and Control-b
keybindings (forward and backward), which scroll by a full page of
text. I don’t like these ones because I never quite know where the cursor is
going to end up and I become disoriented. But it can be handy if you need to
scroll something into view quickly to use Seek mode on it. Unlike Control-d
and Control-u, Control-f and Control-b can be prefixed with a count, so
you can type 5<Control-f> if you need to scroll ahead by 5 pages.
To scroll the window by a single line, use Control-y and Control-e. I have
no idea why these keybindings were chosen. There is no mnemonic. I easily
forget them, and so I never use them. These keybindings accept a count, so if
you can remember them, they are useful for subtle repositioning of the text.
The main advantage of these keybindings is that they don’t move the cursor
unless it would scroll off the screen, so if you are working on a line and need
more visibility but don’t want to move the cursor, you could use Control-y
and Control-e to do it.
The reason I don’t use these keys (other than lack of a decent mnemonic) is
that I prefer to do relative cursor positioning using z mode.
3.2.1. Z Mode
The z menu mode is an eclectic mix of cursor positioning, code folding, and
random commands. You can see a list by pressing the z key while in Normal
mode:

Figure 14. The
z MenuIf that looks like a big menu, you don’t know the half of it! There are a ton of other z-mode keybindings that are obscure enough that the which-key plugin doesn’t bother to list them in the menu! I’ll cover the three most useful scrolling related ones here and we’ll discuss others later.
The relative cursor keybindings I use exclusively are zt, zb, and zz.
These move the line that the cursor is currently on to the top, bottom,
or middle of the screen, respectively, where middle is represented by the
easy-to-type double letter. When moving to the top or bottom it will leave
a few lines of context above or below the cursor.
There are others that will also move the cursor to the first column of the
window, but instead of memorizing those shortcuts, I recommend combining the
previous commands with 0 instead, as in zt0, zb0, and zz0. The 0
command just means “Go to the start of the line”. You can also use home if
your keyboard has a home key, but 0 is easier to hit on many keyboards.
You can find other scrolling keybindings in the Neovim documentation by typing
:help scrolling, but the ones I just mentioned will probably more than cover
your needs as you learn far more nuanced methods of navigating code.
3.3. The First Rule of Vim
So there is a holy rule in Vim that I constantly break for valid reasons. Unless you are the very strange combination of weird that I am, you probably should not break it quite so often:
Never use the arrow keys to move the cursor.
The background behind this rule is that it takes a tenth of a second or so to move your hand to the arrow keys on most keyboards, and another tenth of a second to move it back to the home row. I’m not convinced these tenths of a second add up to an appreciable amount of time, even considering the millions of characters I have typed in my lifetime. (Yes, millions. I did the math once).
But I do think the arrow keys on most keyboards can do nasty things to the long term health of your hands, and honestly, the more you get used to the alternative Vim keybindings, the more you’ll prefer to use them.
The Vim keybindings for arrow keys seem rather unintuitive when you first look
at them: h, j, k, and l. These map to the directions, left, down, up,
and right. If it seems weird that l means right instead of left, or
you’re wondering why they skipped i since that appears to be an alphabetic
sequence, look at your keyboard.
If you are an English-speaker with a standard Qwerty keyboard, the letters h,
j, k, and l are on the home row under your right hand, in that order, and
are therefore the easiest keys to hit on the entire keyboard.
Open a largish file in Neovim (you can use :e path/to/filename) and
experiment with moving the cursor left, right, up and down using the home row
keys.
Vim, Neovim, and LazyVim are all really good at reusing motions, so you will
find that h, j, k, and l are used for a lot of different navigation
sequences as you progress through this book. Take enough time to really get
used to them. But recognize that if you ever have to push these keys more
than twice in succession to move the cursor, you’re wasting keystrokes.
3.4. Counting
The vast majority of commands in Vim can be prefixed with a count to repeat the motion multiple times. The count is typically entered as a sequence of digits before the command you want to repeat.
So, for example, to move the cursor up 15 lines, you would enter Normal mode
and hit the keys 15k. To move it five characters to the right, use 5l.
This is why LazyVim has such weird line numbering by default. Consider the following screenshot:
Figure 15. Relative Line Numbering
My cursor in this screenshot is on line 126, which is highlighted in the left
gutter. It is also visible in the lower right corner of my window, though I
cropped it out in this screenshot. But directly above line 126 we see the
line number 1, and directly below it we also see the line number 1.
Let’s say I want to move my cursor to the Scrolling the screen heading.
This line has the number 5 beside it, so I don’t have to count lines or do
any mental arithmetic to figure out the count to use to move my cursor. I just
type 5j and my cursor moves to the desired line.
Now that you know what they are for, I suggest leaving relative numbers on
until you get used to them. If you find them distracting or just don’t use
them, you can change to normal line numbers by editing your LazyVim
configuration. Open the file ~/.config/nvim/lua/config/options.lua, which
should have been created for you by LazyVim but currently won’t have anything
in it other than a comment describing what it is for.
You can use the Space mode command <Space>fc to quickly find files in the
LazyVim configuration directory. This will pop up one of the file pickers
that we’ll discuss in detail in the next chapter. Type options and press <Enter>
to open the file. |
To disable relative file numbers by default, add this line to the file and save it:
Listing 7. Disable Relative Line Numbers
vim.opt.relativenumber = falseThen reopen Neovim, and you should see the absolute value of line numbers in the left column.
Personally, I find line numbers to not be very useful and I don’t like wasting
valuable screen width on displaying those characters. As has become a running
theme, I recognize that I am somewhat odd! But if you also want to disable
line numbers altogether, you’ll need a second line in options.lua:
Listing 8. Disable All Line Numbers
vim.opt.number = false
vim.opt.relativenumber = false
3.5. Find Mode
If you need to move your cursor to a position that is relatively close to its current position, you may want to use LazyVim’s Find mode instead of the Seek mode we described earlier. The default Find mode in Neovim is rather limited, but the flash.nvim plugin that enables Seek mode makes it much nicer to use.
To enter Find mode, press the f key. Like Seek mode, a portion of your screen
will dim, indicating that you should type another character. After you do so,
all instances of that character after the cursor will be highlighted. For
example, fs will highlight all instances of the letter s after the current
cursor position.
This is where the similarities between Find mode and Seek mode end,
however. Instead of showing a label, the cursor immediately jumps forward to
the first matching character after the cursor. You’ll also notice that none of
the text before the cursor has been dimmed, and that none of the matching
characters in the lines before the cursor are highlighted.
Instead, we need to use counts to jump to later instances of the character. If
I want to jump ahead to the third highlighted s, I type 3f and my cursor
will move there. However, if you want to jump to a much later s, you probably
don’t want to individually count how many s keys there are. Luckily, after
you use a count, LazyVim leaves you in Find mode, so you can just guess how
many s characters there are, and then once you are closer, repeat with a new count.
If you only want to jump ahead by one s character, you don’t need to enter a
count, just press f by itself and you’ll move ahead.
If you miscounted or misguessed and jump too far, don’t worry! You can take
advantage of the fact that (Shifted) F means “find backwards”, and can also be
counted. So if you need to move to the 15th highlighted s, it’s totally fine
to guess 18f, realize you’ve gone three too far, and use 3F to jump
back to the previous character.
Moreover, if you know that the character you are looking for is behind or above
your cursor in the document, you can enter Find mode with F instead of f in
the first place. This will immediately start a backwards find operation instead
of a forward one. And if you know right off the bat that you want to jump back
or ahead by three instances of the given character, you can use a count when
you first enter Find mode.
There is also a subtle variation of Find mode that I call “To” mode,
although the official Vim mnemonic is actual “'Til” mode. You enter it
with a t or T depending on what direction you want to go.
“To” mode behaves identically to Find mode except that it jumps to just before the target character.
You might think that To mode is kind of redundant because you could fairly
easily use Find mode followed by a single h to move the cursor left. But “To”
mode is extremely useful when you are combining it with operations to edit the
text, which we will discuss later. As a taste, if you use the command d2ts,
it will delete all text between the cursor and the second s it encounters, but
leave that s alone. This is much easier than the d2fsis<Escape> that would be
required if you used a find command and then had to enter Insert mode to add
the s back.
3.6. Moving by Words
When f or t feels too big, and cursors with counts feel too small, you’ll
most likely want to use the word movement commands. In other editors and IDEs
you might be used to getting this functionality by holding Control, Alt, or
Option while using the arrow keys.
Neovim is easier; you don’t have to move your hands to the arrow key section of the keyboard and you don’t have to hold down multiple keys at once.
Instead, you can just enter Normal mode and press the w key to move to the
beginning of the next word. If you instead want to move to the end of the
current word, use the e key. If you are already at the end of the current
word, e will go to the end of the next word.
This is useful when you want to combine it with counts: If you need to move to
the end of the word that is two words after the current word, press 3e. This
is the same as pressing e three times, which would move to the end of the
current word, then the next word, and finally to the end of the word you want
to hit. w can also be prefixed with a count if you need to move to the
beginning of a word that is a certain number of words after the current one.
Use the b key if you want to move backwards instead. This will move you to
the beginning of the current word, or if you are already at the beginning of
the word, it will move to the beginning of the previous word. As before, use a
count to move to the beginning of even more words.
Surprisingly, it takes a bit more work to move to the end of the previous
word, as you need to press two keys: g followed by e. The mnemonic for this
is “go to end of previous word”. In practice, you’ll find that you
hardly ever need this functionality for some reason, and the honest truth is I
usually use be (b to move to beginning of previous word, then e to go to
end of that word) to move to the end of the previous word. If you do use ge,
however, it can be combined with a count as well. You’ll need to type something
like 4ge, depending on the count. The command g4e wouldn’t do anything
useful.
Collectively, you may occasionally hear the w, e, and b commands referred
as the “web” words. It just means "moving by words". These are probably the
most common movements you will use, more than individual cursor positions,
simply because most editing actions tend to involve changing or deleting a word
or sequence of words.
3.7. Moving by Words, Only BIGGER
The “shifted” form of the web words also move by words, but the definition of
“word” is subtly different. Specifically, a capital W will move to just after
the next whitespace character, where a lowercase w will use other forms
of punctuation to delimit a word. Consider a method call on an object
that looks something like this in many languages:
Listing 9. Example Method Call
myObj.methodName('foo', 'bar', 'baz');If your cursor is currently at the beginning of that line, a w will move
your cursor to the period on the line, a second w will move you to the m,
and subsequent w presses will stop at the paren and quotes as well.
On the other hand, if your cursor is at the beginning of the line, a W
will move you all the way to the first quote in the "bar" argument, since
that is where the first whitespace character is.
As a visualization, here are all the stops on that line of code when you use
w compared to when you use W:
Listing 10. Behaviour of
w and WmyObj.methodName('foo', 'bar', 'baz')
-----ww---------w-w--w--ww--w--ww--w---->
------------------------W------W-------->The B, E, and gE motions behave similarly, moving in the appropriate
direction by whitespace-delimited words instead of punctuation ones.
One thing that is kind of annoying both in Vim and the way LazyVim is
configured is that there’s no way to navigate between the individual words of
CamelCaseWords or snake_case_words. You can use fC or t_ and similar if you
want to, but I will later show you how to set up the nvim-spider plugin
that makes navigating these common programming constructs simpler.
3.8. Line Targets
Very frequently, you need to move to the beginning or end of the line you are
currently editing. Often you can use I or A for this if your goal is to
move to that location and enter Insert mode, but if you need to move there and
stay in Normal mode (e.g. for other purposes such as to delete or change a
word) you can use the ^, $, and 0 commands.
If you are familiar with regular expressions, you might know that ^ is used
to match the start of text or start of the line and that $ is used to match
the end, so the mnemonic of using these two keybindings to match the beginning
and end of the current line will hopefully be less unmemorable than they seem
at first.
There is a certain lack of symmetry between the two, however. The $
(Shift-4) command simply means “go to the end of the line”, as in the last
character before the ending newline, no matter what that character is. The ^
or caret (Shift-6) means “go to the beginning of the text on this line”. The
“of the text” there is important: if your line has whitespace at the beginning
(e.g. indentation), the ^ caret will not go to the very first column, but
will instead go to the first non-whitespace character.
To move to the very beginning of the line, use the 0 key. 0 is the only
numeric key that maps to a command because the others all start a count. But it
wouldn’t make sense to start a count with 0, so we get to use it for “move to
the zeroth column”.
There is also a command to go to the end of the line excluding whitespace, but I have never used it, probably because I usually have formatters configured to trim trailing whitespace so it doesn’t come up.
The two character combination g_ (g underscore) means “go to the last
non-blank character”. I guess _ kind of looks like "not a space", so it’s
kind of mnemonic? I include it to be comprehensive, but you’ll likely not use
it much. You also have the option of combining other commands you’ve learned so
you don’t have to memorize this one-off. For example, you can use the three
character $ge (combining “end of line” with go backwards to end of word) or
$be to move to the last non-blank on the line. You have options; pick the one
that you find is easiest to remember or type!
3.9. Jumping to Specific Lines
If you compile some code or run a linter, you will invariably be given a line number where the error occurred (unless the compiler is particularly useless).
You can jump to a specific line by entering the line number as a count,
followed by (shifted) G. So 100G will move your cursor to line 100.
Alternatively, you can use the :100<Enter> ex command.
G can also be issued without a count, in which case the G command will
always take you to the end of the file.
You can go to the top of the file with 1G if you want, but since this is such
a common operation, you can instead use gg (two lower-case gs). The
mnemonic for g in all cases is “Go to”, and there are a lot of things that
can come after a g (:help g will introduce you to the ones I don’t cover,
although be aware that LazyVim has overridden some of them).
Since the most common place you are likely to want to “go to” is a line number,
the easiest to type G and gg commands are used for line number navigation.
3.10. Jump History
All this jumping around can make you feel a little lost. Luckily, there are two super-useful keybindings for going back to places you previously jumped.
Control-o is the non-modal control-based keybinding that I use most often. I
should honestly bind it to something more accessible, I use it so much. It
basically means “Go to the place I jumped from”.
This is super handy when you’re editing code deep in a file or module and
realize you need to import a library at the top of the file. You can use gg
to jump to the top of the file, s to seek to the line you want to add the
import on, and then enter Insert mode to add the import. Now you want to go
back to the code you were working on so you can actually use the import.
Control-o a couple times will take you there.
Neovim keeps a history of all your jumps, so you can jump between several locations (perhaps to look up documentation or the call signature for a function) and always find a way back.
If you jump too far, you can use the Control-i keybinding to jump forward
in history. It’s just the opposite of Control-o. I don’t know why i
and o were chosen for these; maybe because they are side-by-side on a
Qwerty keyboard? They are used commonly enough that once you learn them,
you won’t forget.
3.11. Summary
Navigating code is a huge topic in Vim. You’ve already learned enough commands that you can navigate a Vim window more efficiently than most non-modal editors can dream of. But we’ve barely scratched the surface, and we’ll be covering a bunch of even more useful code navigation commands later.
We covered the LazyVim Seek mode to jump anywhere in the visible window, and
then the scrolling commands to make sure the thing you want to jump to is
visible. Then we covered moving the cursor with the home row keys and
multiplying them with counts.
We learned how Find mode differs from Seek mode, even though they are superficially similar. Then we covered some standard keybindings for moving by words and to key places on a line before jumping to specific lines. We wrapped up by covering how to navigate to places you have jumped before.
In the next chapter, we’ll learn more about opening files and navigating the filesystem.